The Secure Shell
Each chapter is being updated to match the latest version of the print book, available from Amazon and No Starch Press. There may be some inconsistencies in links or minor content differences until this page is fully migrated.
So far we have been using the shell to operate on our local machine. We can use Secure Shell Protocol, or SSH, to open a secure network connection to a remote machine and use the shell to work on that machine.
In this chapter we'll look at how to setup the required credentials and keys to allow us to securely connect to a remote machine, how to create a virtual machine in the cloud and then how to connect to that machine from our local machine using the ssh program. We'll also look at how to configure SSH to make it easier to work with!
What is SSH?
SSH is the Secure Shell Protocol. It is a protocol that has been used for decades as a way to establish a secure connection to a remote machine, on your network or across the internet. The program named ssh is the 'secure shell' - it is a program that helps you establish SSH connections, manage credentials, and open a shell on a remote machine.
When you connect to a remote machine, you will typically have to authenticate. It is possible to authenticate with a username and password. In most scenarios however you will have to use Asymmetric Encryption to authenticate with the server.
Asymmetric encryption uses special 'keys', called 'public keys' and 'private keys' to manage authentication and secure data. This might be new to you if you are used to using simple authentication protocols such as username and password. But public/private key based security is extremely secure and a great thing to know about! So let's start by looking at how public and private keys work and then create our own key pair which we will later use to secure our connections.
An Authentication Crash Course
The details of symmetric and asymmetric encryption complex and beyond the scope of this book1. We'll cover the only essential concepts and techniques in this chapter.
Before we look at asymmetric encryption, let's take a quick look at the challenges of symmetric encryption - which will help explain why asymmetric encryption is preferred.
Symmetric Encryption for Authentication
When we use symmetric encryption, we have a shared 'secret', normally something like a username and password. If a user 'Alice' wants to send a message to another user, 'Bob', we have to share the secret so that Bob can decrypt the message that Alice sends:
loading...The diagram above is a hugely simplified view, but essentially shows that when the users want to exchange a message they both need to know the secret - one user uses the secret to encrypt the message, the other uses the same secret to decrypt it.
When you connect to a remote machine using symmetric authentication, you are the client (Alice) and the machine is the server (Bob).
Now in reality there are ways to obscure and protect this secret somewhat, but no matter how many clever tricks are used, we are still in the situation where the recipient has sensitive data - the user's secret. This is actually quite problematic because it means if we don't trust this user, or their machine or environment, we might not want to share a secret.
Asymmetric Encryption for Authentication
When we use asymmetric encryption, Alice first creates a 'key pair'. This is two files - a public key and a private key. Alice keeps the private key and sends the public key to Bob:
loading...Now that Bob has the public key, he creates a secret that only he knows and then encrypts it with Alice's public key. He then sends this secret to Alice. The secret was encrypted by Alice's Public Key - meaning only the associated Private Key can decrypt it. This means even if someone intercepts the secret they cannot decrypt it! Only Alice can, as only Alice has the private key:
loading...Now Alice has Bob's secret and only she can decrypt it. Once she decrypts it both she and Bob have a shared secret - that no one has been able to intercept. They can now use Symmetric Encryption to exchange messages, safe in the knowledge that the secret is kept just between them.
The fantastic thing about this mechanism is that only Alice can decrypt messages encrypted with her public key. Alice can keep her key private. Her public key is not sensitive - it can only be used to encrypt messages for Alice.
Alice can also encrypt messages with her Private Key - anyone who has the Public Key can decrypt them. This means that this is not a secure way to encrypt a message - but it is a very good way to sign a message. Given that only Alice has the private key, only she can encrypt messages with it. This means if she sends a message encrypted with her private key anyone who has the public key can decrypt it to assert it was sent by Alice - she's the only person with the private key.
This method of signing messages with the Private Key is not used to keep the message private but instead to verify the identity of the sender.
Most modern day cryptography protocols are based on this technique. In many of them Bob will not actually send back a secret - instead he'll generate his own key-pair and return the Public Key. This is called a 'key exchange'. Almost all modern day encryption is built on this mechanism - when you open a secure connection to a website, an exchange of keys is made between you and the server2.
When we use the secure shell to communicate with a remote machine, we will give the remote machine our public key, and we will encrypt our communications with the private key. This is essential because other users might have access to the remote machine - we don't want them seeing our sensitive data such as passwords or private keys.
Let's look at how to create a key-pair now.
Creating a Key Pair
We can use the ssh-keygen (OpenSSH authentication key utility) to create a key pair. We are going to use this key pair to communicate with a server that we will create on Amazon Web Services or AWS. AWS requires that we use a particular format known as PEM, so let's create a key pair in that format now. We will move to the ~/.ssh folder first, which is where users often store their SSH keys:
cd ~/.ssh
ssh-keygen -m PEM
When you run this command, it will ask you where you would like to save the file:
Generating public/private rsa key pair.
Enter file in which to save the key (/home/dwmkerr/.ssh/id_rsa):
I suggest that you use the default location (the ~/.ssh folder), but name the key pair 'effective-shell':
Enter file in which to save the key (/home/dwmkerr/.ssh/id_rsa): effective-shell
Enter passphrase (empty for no passphrase):
At this point you will be asked to provide an optional passphrase. We will leave this blank as we are not going to use the server or key for any particularly sensitive data. However, if you are creating keys that will encrypt sensitive data you should definitely add a passphrase. If you add a passphrase, you'll be required to enter each time you load the key. This adds a layer of security - if someone steals your private key they would have to know the passphrase to open it.
Once you have skipped the passphrase and passphrase confirmation by pressing the enter key twice, you'll see the final output:
Your identification has been saved in effective-shell
Your public key has been saved in effective-shell.pub
The key fingerprint is:
SHA256:HcqIl3ZhRz9jvhYO3g64FEYT3mAoDc6P4mnh4aKuY08 dwmkerr@macbook
The key's randomart image is:
+---[RSA 3072]----+
|    .o .+ .      |
|   o. oo = .     |
|    o.  * + =    |
|     + * * + o   |
|  + o * S o o    |
| + = o o + + o   |
|. *E    o o =    |
|o+.    . . +     |
|*o..    .   .    |
+----[SHA256]-----+
The randomart shown is designed to provide a more user-friendly way to identify a key - if you have many keys you can see the randomart for each to pick the one you want. I have not yet met anyone who remembers their randomart so I think it's safe for you to ignore it for now!
The essential thing is that we now have two new files - our public and private keys:
$ ls | grep effective
effective-shell
effective-shell.pub
The public key is the key with .pub at the end.
Now let's create a new virtual machine in the cloud and provide it with our public key so that we can access it. To do this, we're going to set up a virtual machine using Amazon Web Services - a popular cloud computing platform. We'll use the free tier, meaning this should not cost you any money!
Setting up an AWS Account
We're going to create a virtual machine in the cloud to connect to and test out ssh. We'll do this using Amazon Web Services, which is probably the most popular cloud services provider. If you already have an account you can skip this part of the chapter. If not, we'll look at how to setup an account now.
To sign up for an AWS account, open the site at:
https://aws.amazon.com/account/sign-up
Choose the 'Create Free Account' option:
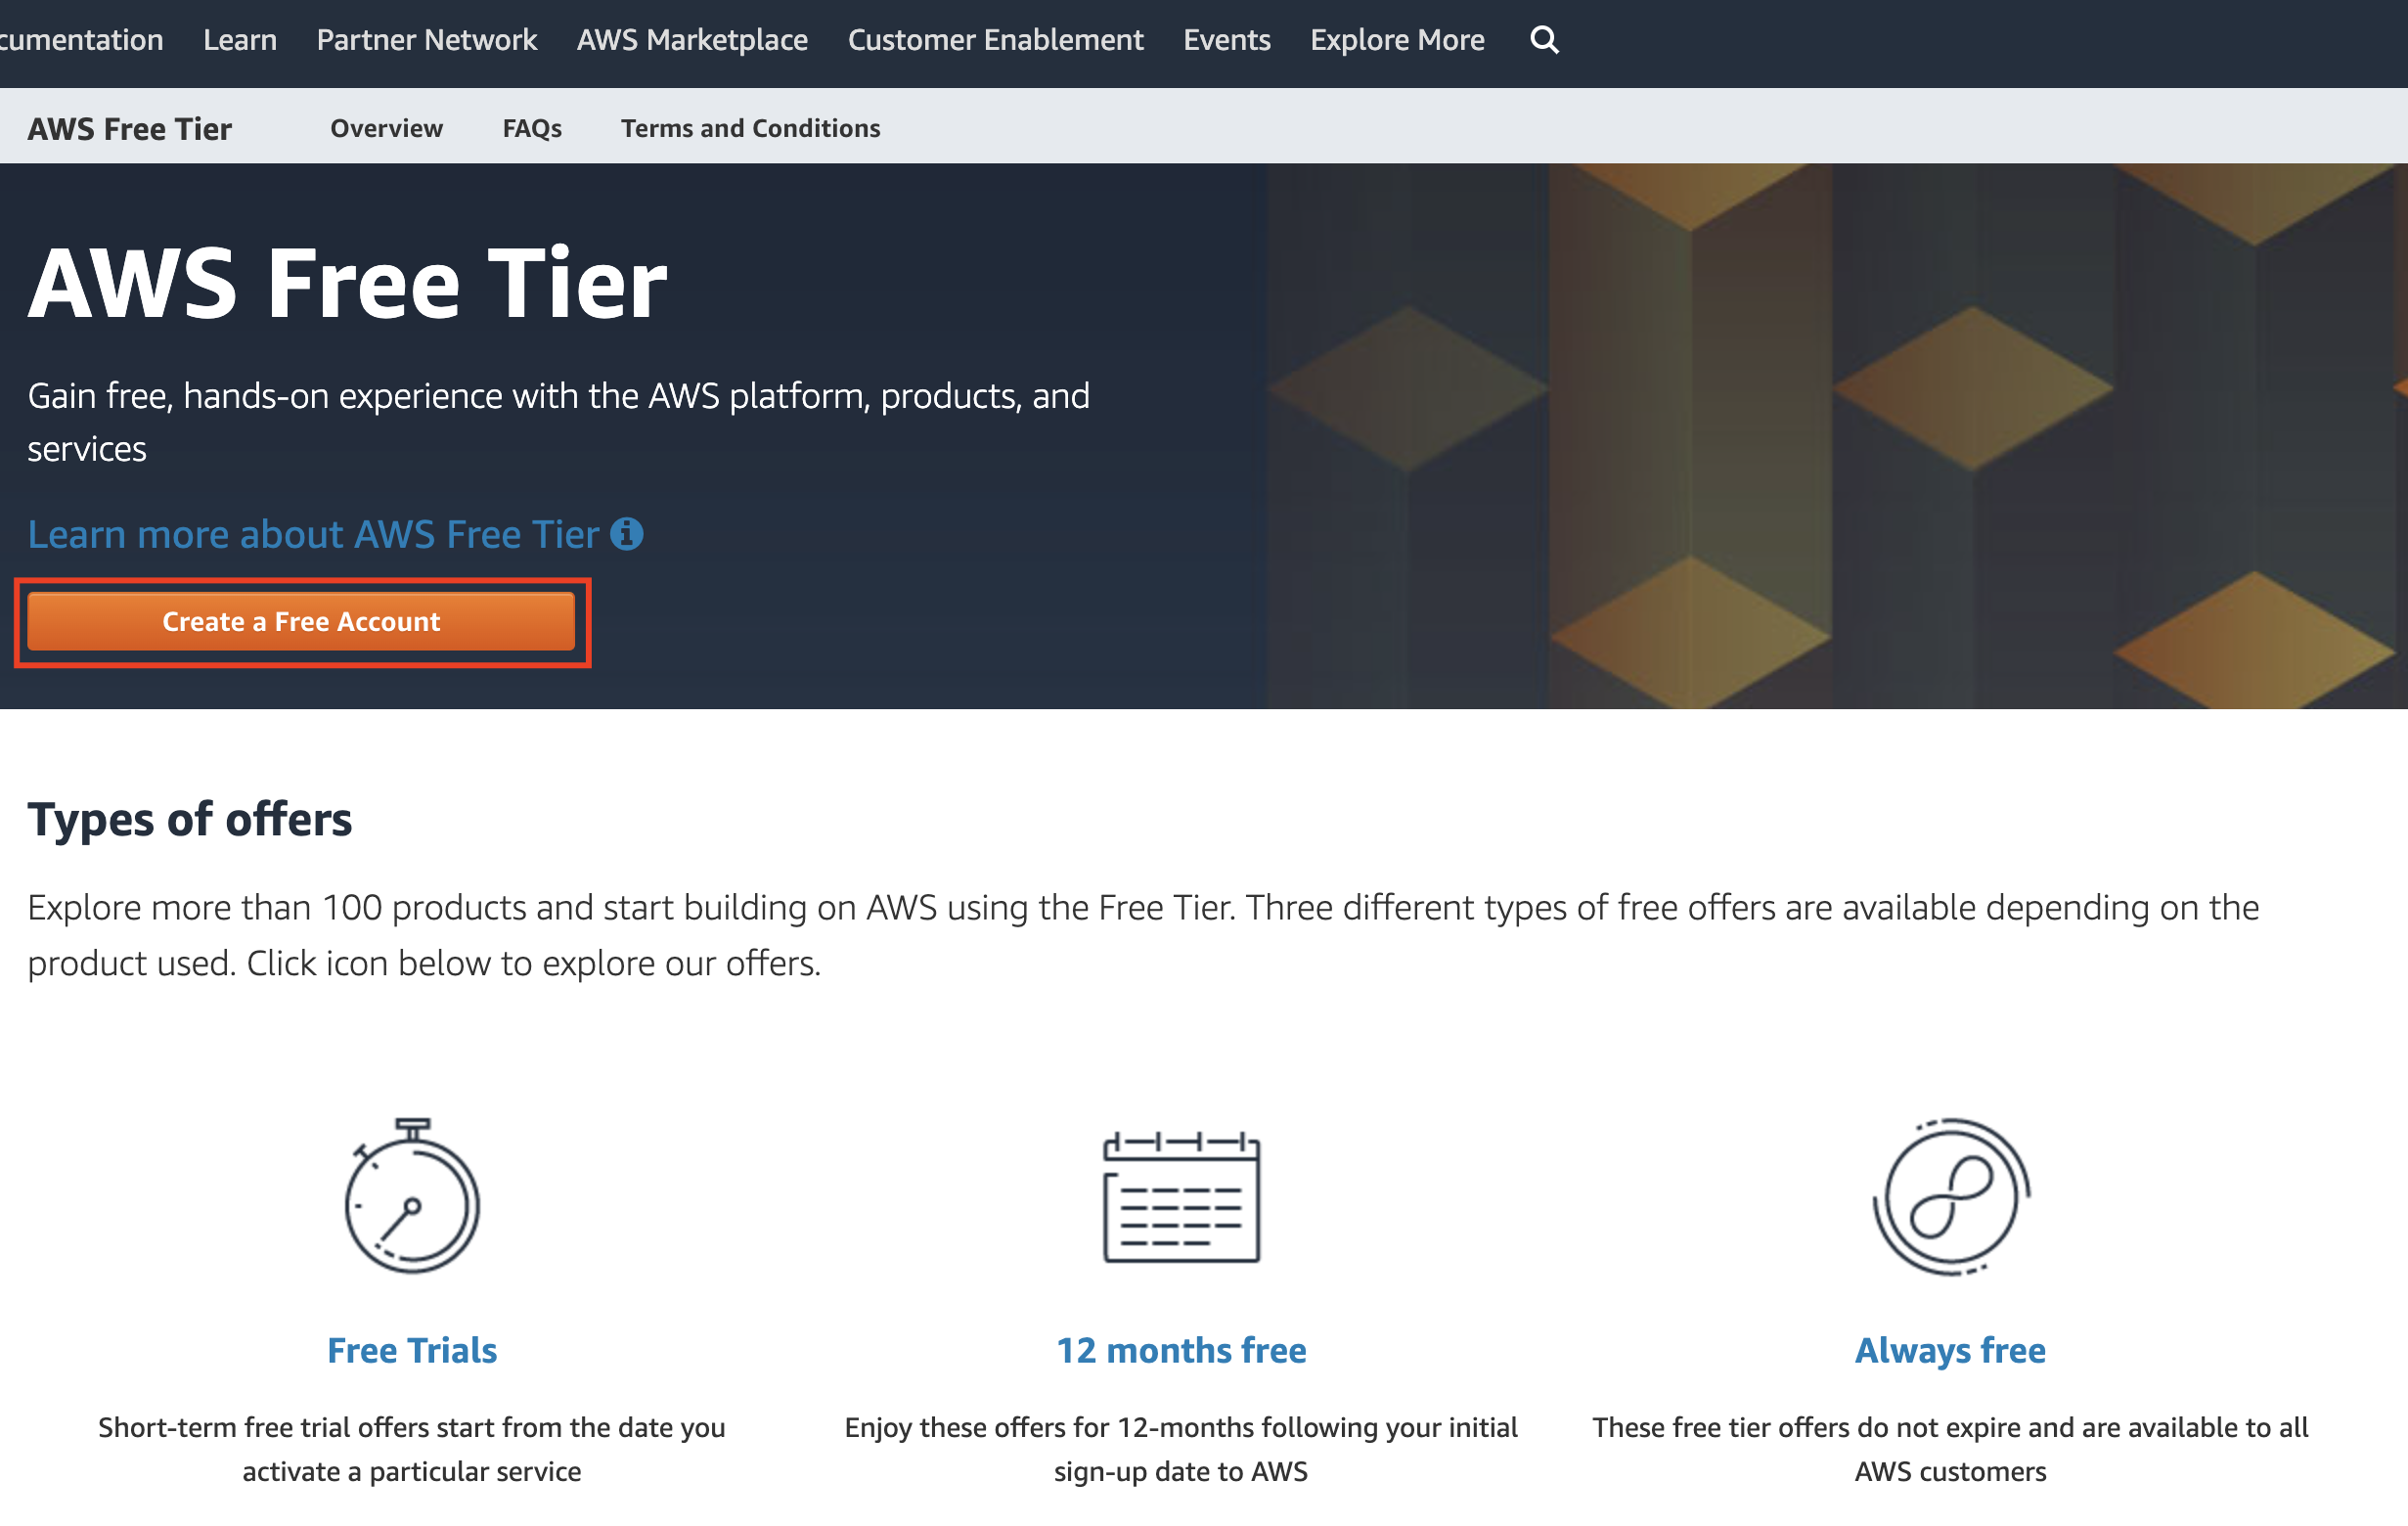
When you sign up you will be asked to provide quite a few personal details, as well as credit card details. Make sure you select the "Basic Support Plan", which is free.
Amazon requires your credit card details in case you use paid services. In this chapter we will be using 'free tier' services that have no costs, but be very careful if experimenting or playing with other services on AWS - most of them are will have some cost associated with their usage.
The costs are generally low and there are safeguards in place to ensure you don't accidentally create expensive resources, but keep your AWS credentials very safe. If someone has access to them they could run expensive services on your account.
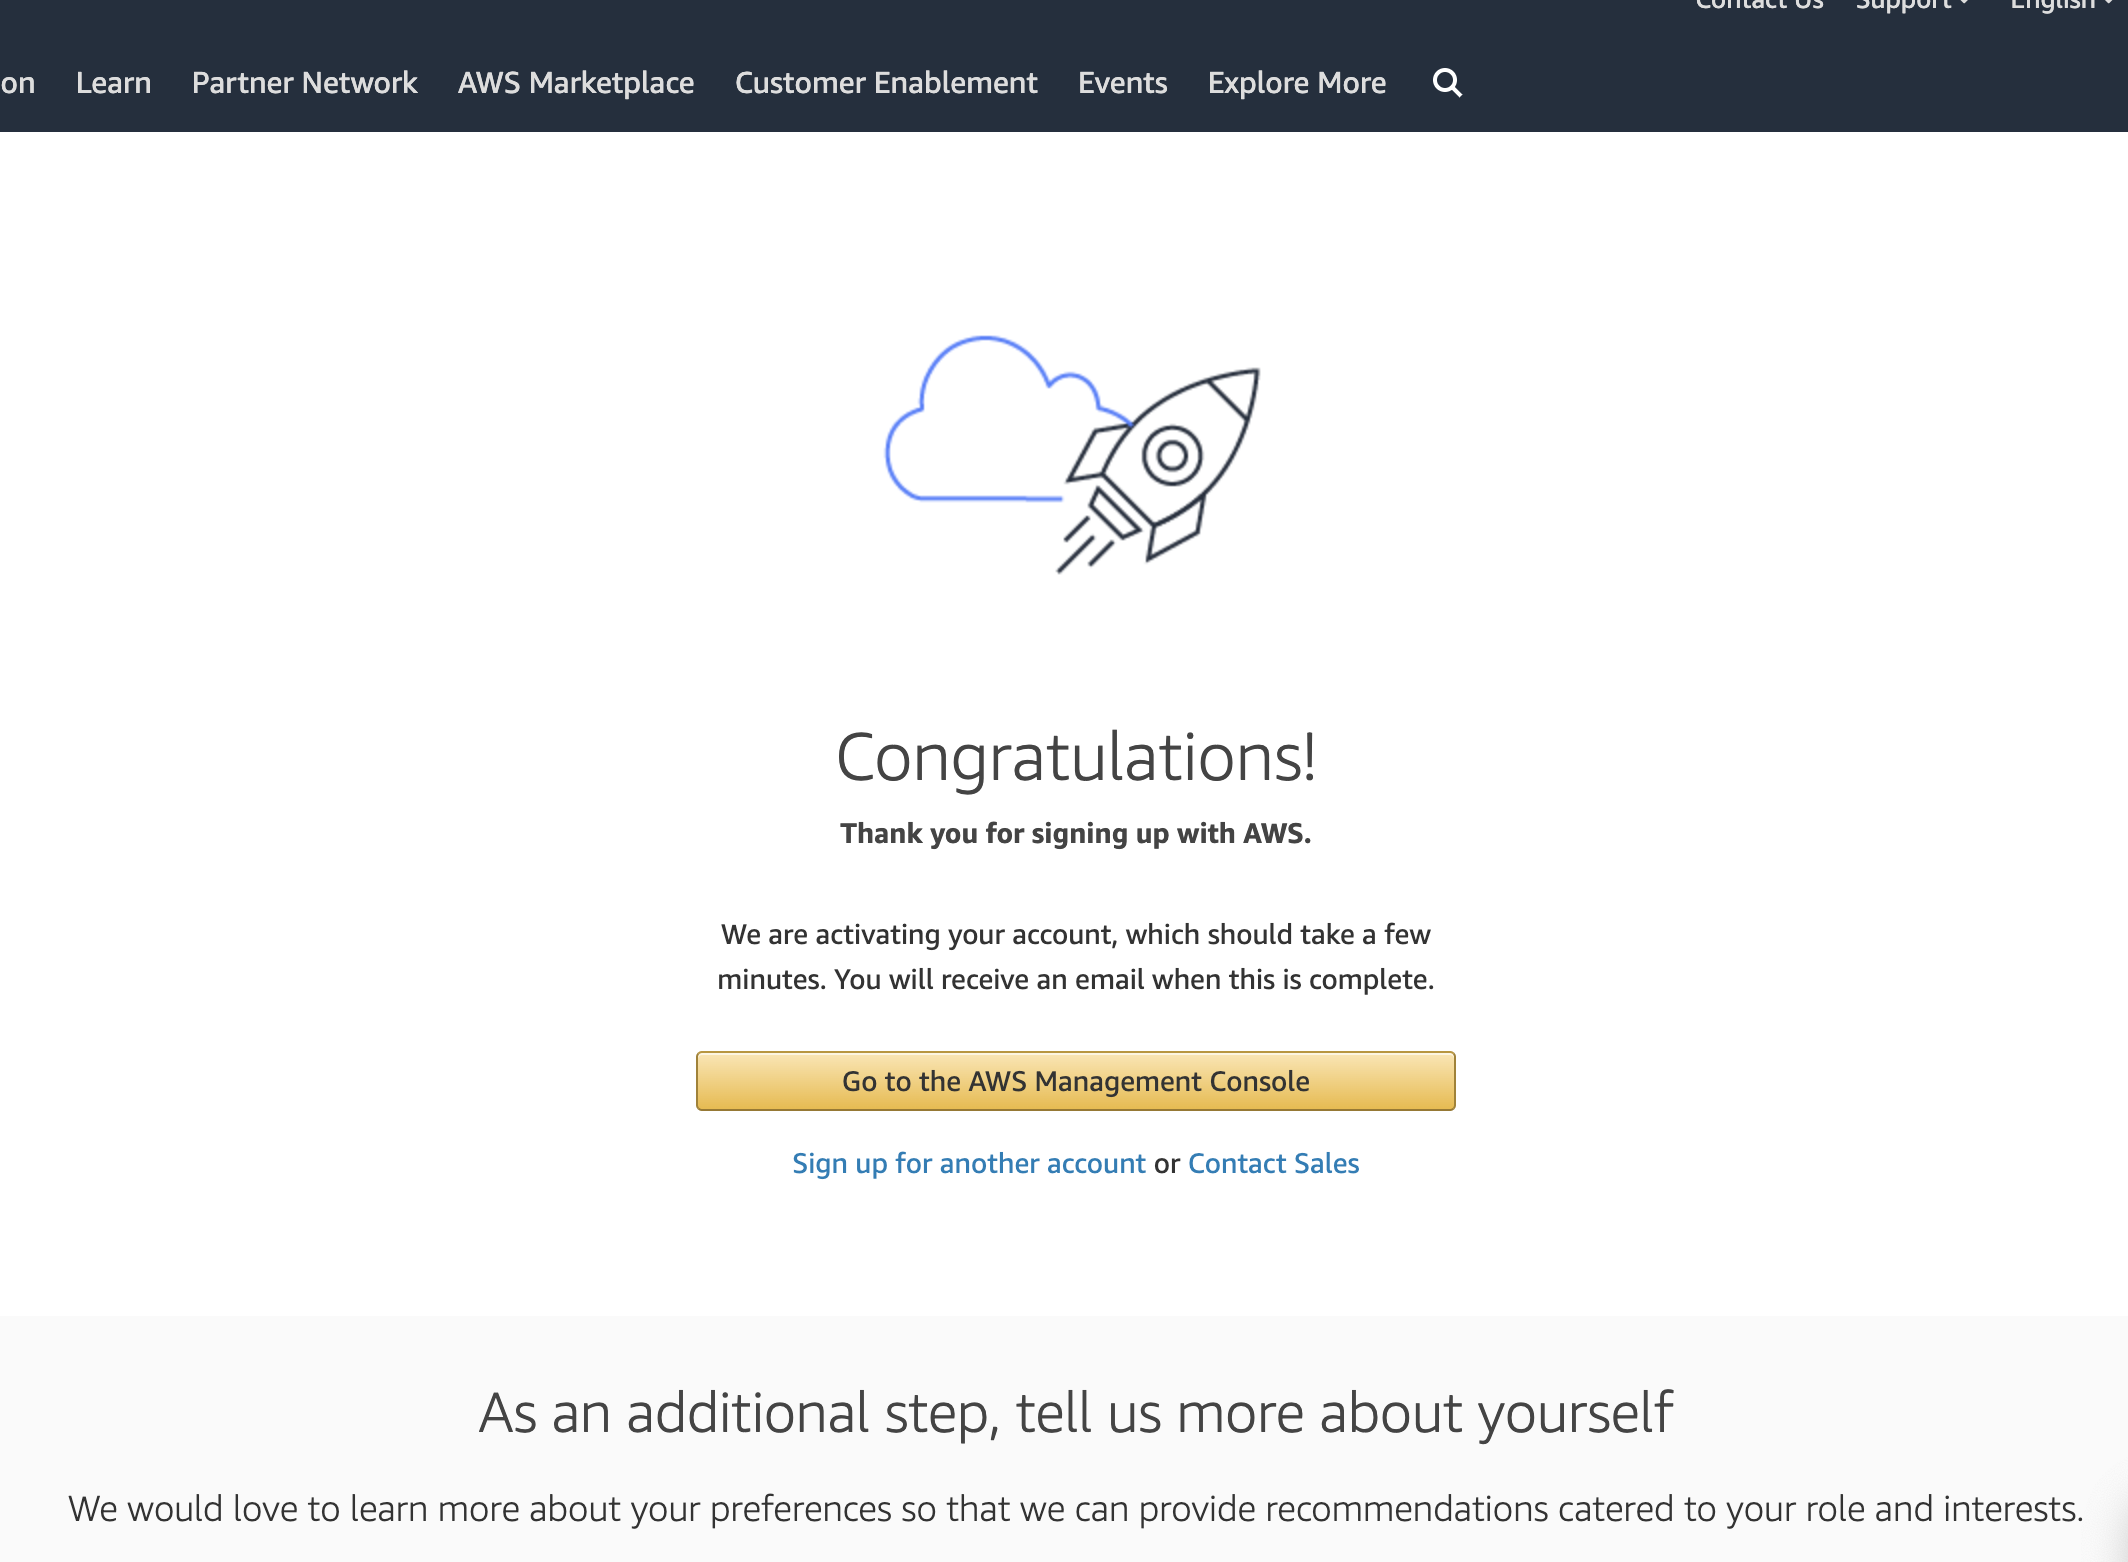
Once you have signed up successfully, you will see the 'congratulations' message. You can now press the 'Go to the AWS Management Console' button to go to the management console.
You will be asked for your password again. Congratulations - you now have an AWS account that you can use to run services in the cloud! Now let's create a virtual machine that we can connect to.
Creating a Virtual Machine on AWS
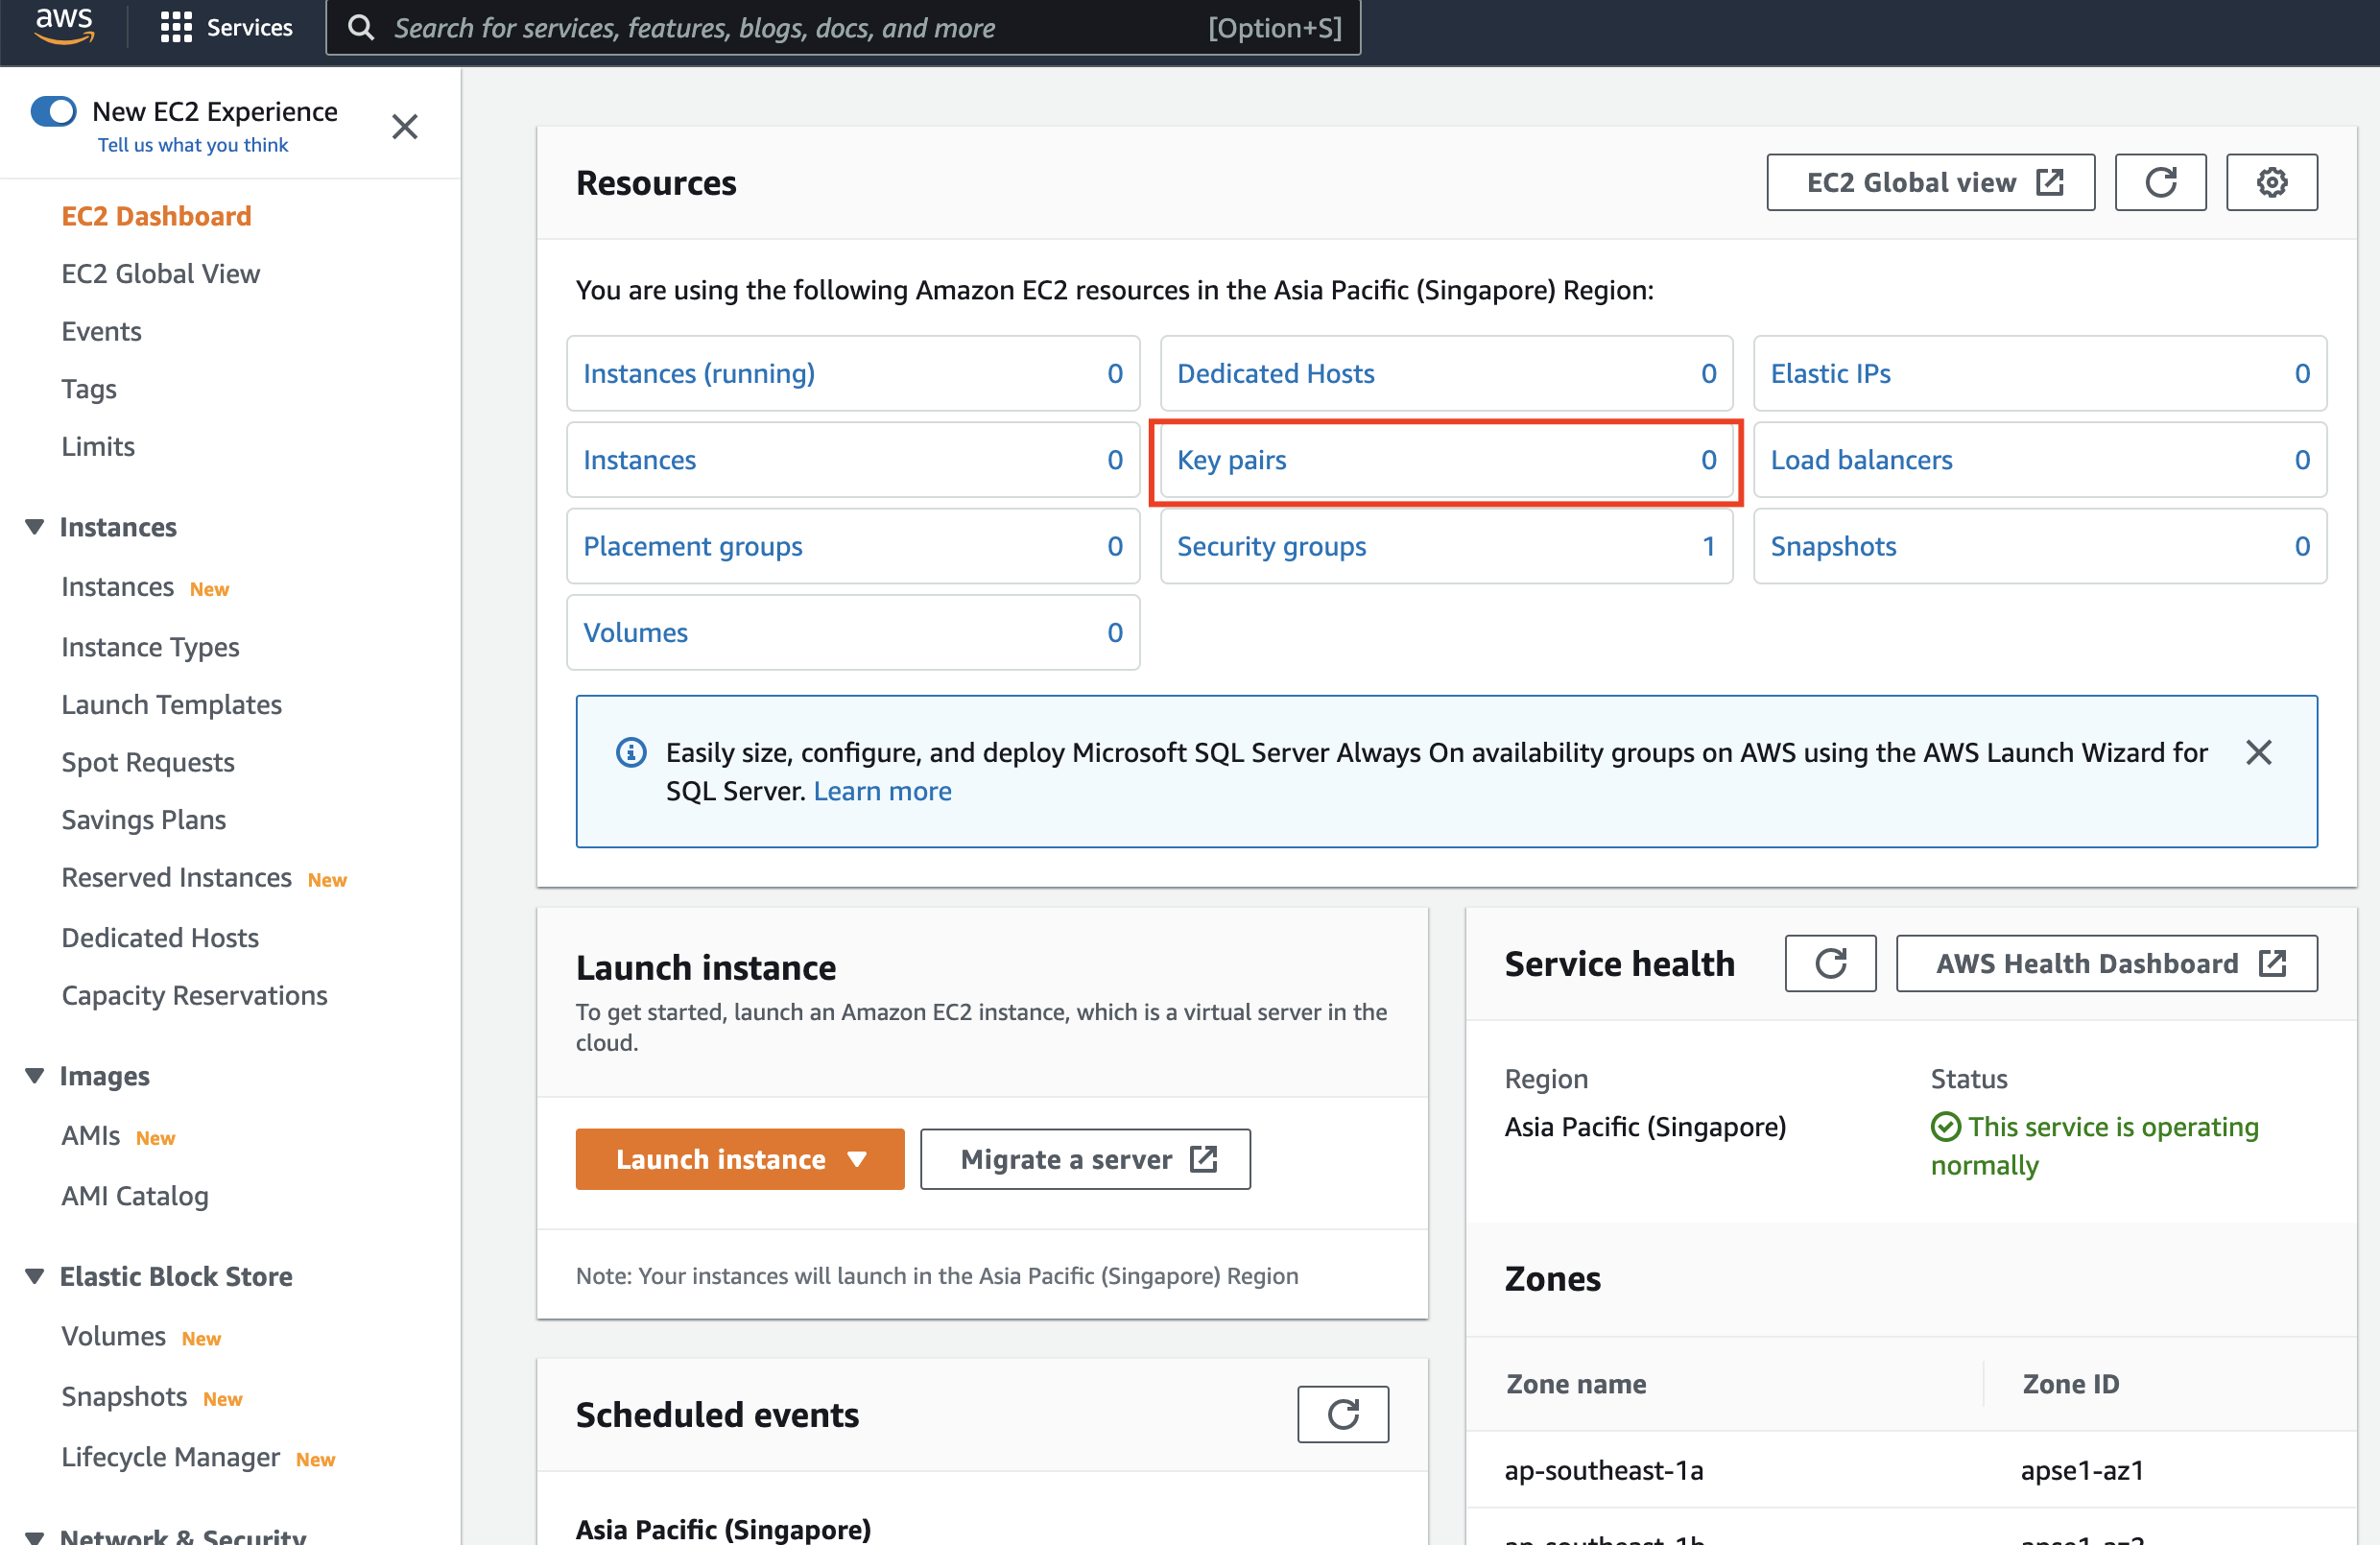
Use the search bar in the AWS Management Console to search for 'EC2'. EC2 is the name AWS uses for its virtual machine services.
The first thing we are going to do is upload our public key to AWS so that it can be used when we create our virtual machine. Select the 'Key Pairs' option from the menu on the left or the dashboard:
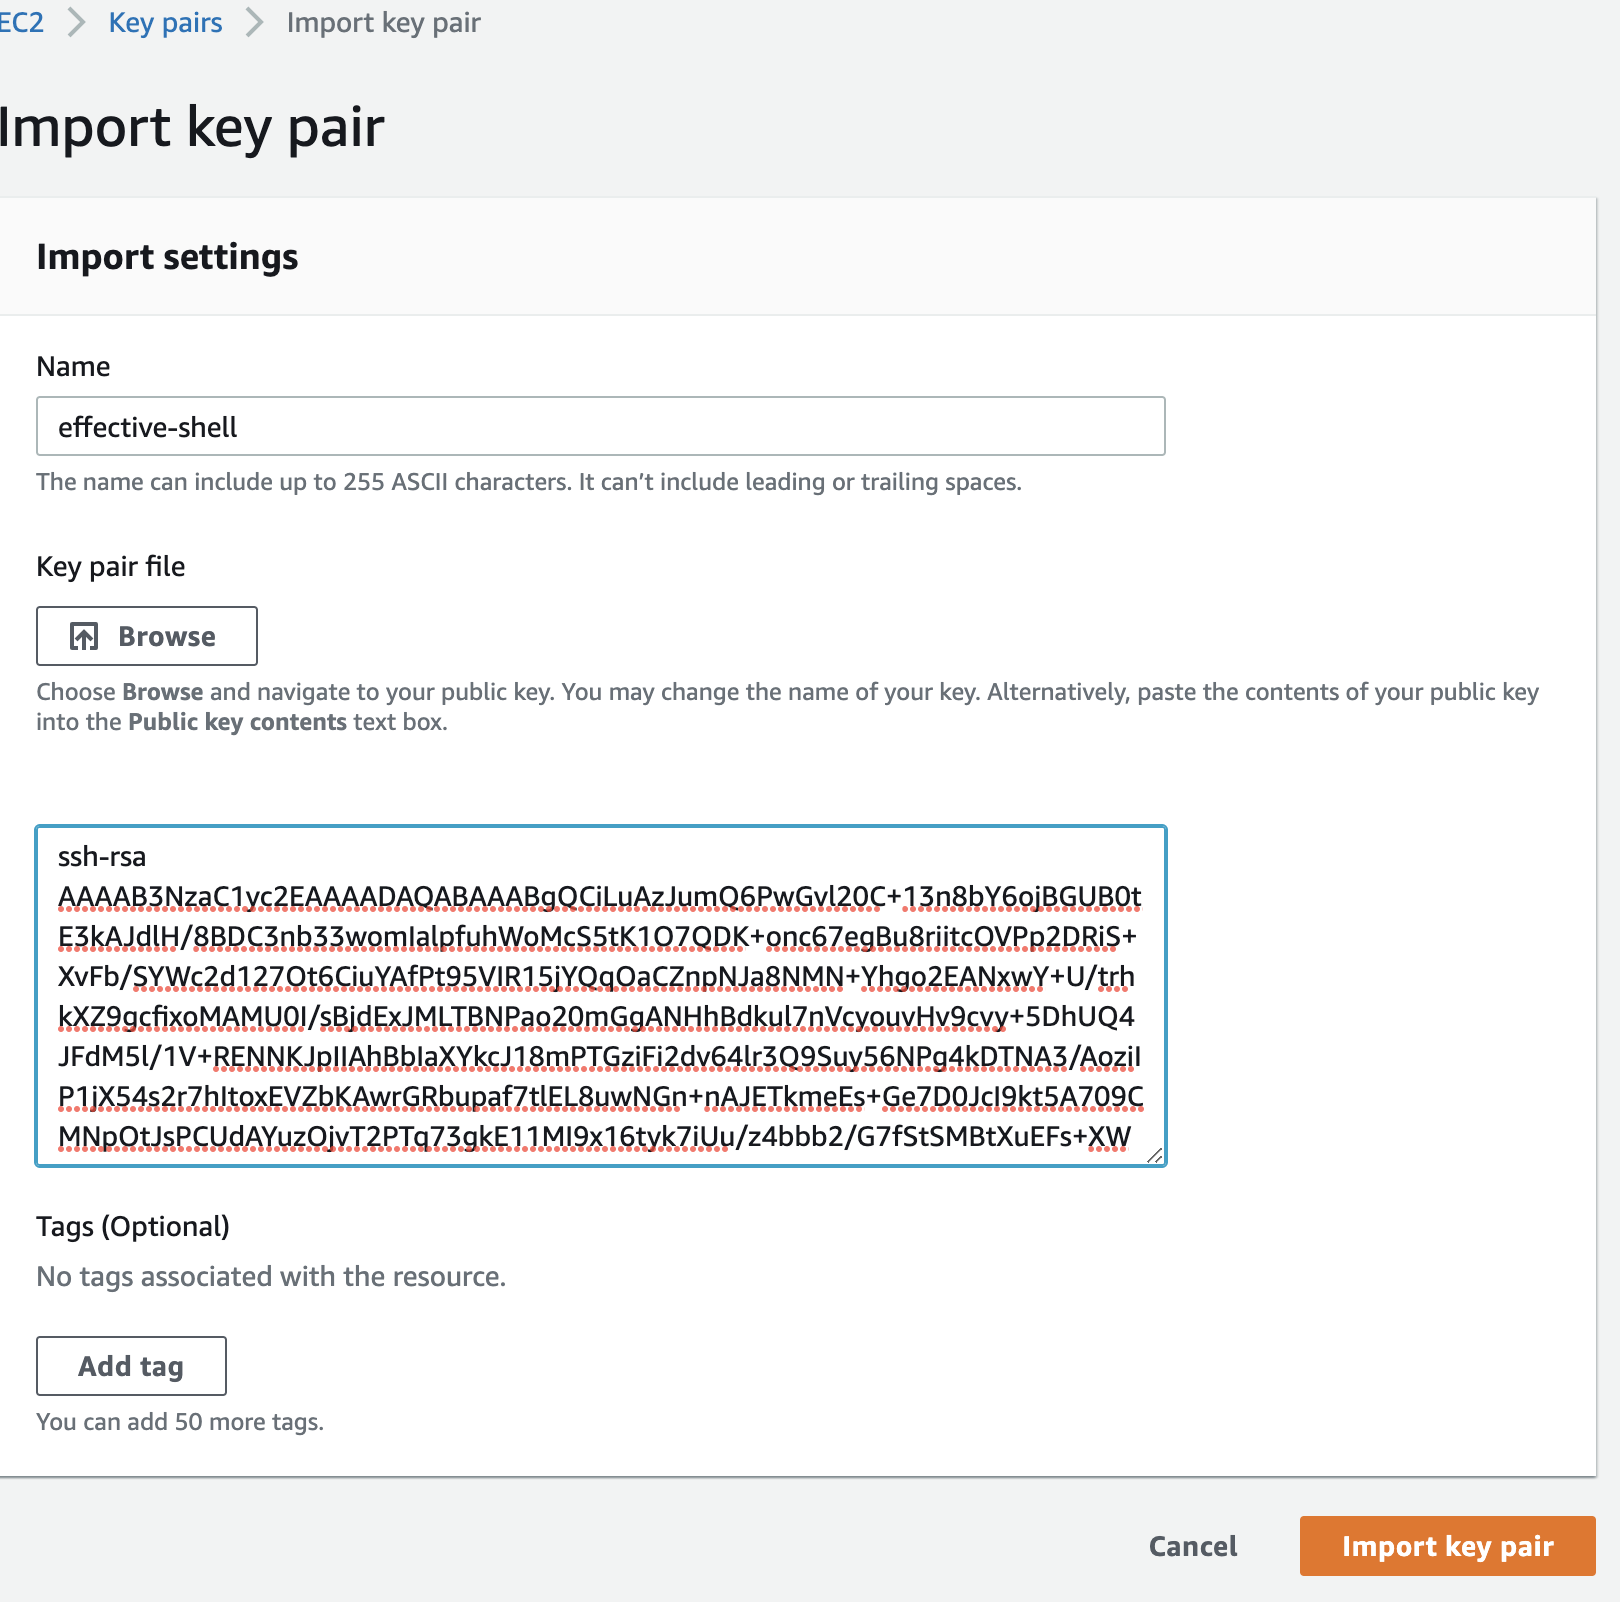
When the key pairs view is open, choose 'Actions > Import Key Pair':

Give the key pair a sensible name and upload the public key file, which will be in ~/.ssh/effective-shell.pub if you have been following with the tutorial. Alternatively you can open that file on your local machine and copy its contents:
Now that the key pair has been imported we can go back to the EC2 dashboard and choose 'Launch Instance':

We are now going to go through a set of options to specify the details of the virtual machine AWS will create for us.
Step 1: Choose an Amazon Machine Image (AMI)
The first option should be Amazon Linux 2 AMI (HVM) - Kernel 5.10, SSD Volume Type, with a 'Free Tier Eligible' label on the left. Press the blue 'Select' button on the right of this machine to choose this instance type.
Step 2: Choose an Instance Type
Select the default t2.micro instance type. This is free-tier eligible and more than powerful enough for our needs.
Now press 'Review and Launch' - we do not need to configure any of the advanced options.
Step 3: Review Instance Launch
There will be a warning saying that 'your security group is open to the world' on this page. We can safely ignore that as we are not putting anything sensitive on this instance. This message is telling us that anyone who knows the address of our instance can try and connect to it.
This is not a problem for what we are doing, as we are creating this machine to experiment with and not putting sensitive data on it.
Press the 'Launch' button on the bottom right - another screen will pop up, don't dismiss this screen, it is where we will choose our key pair!
We will be asked to provide a key pair. Make sure the key pair you just imported is selected!
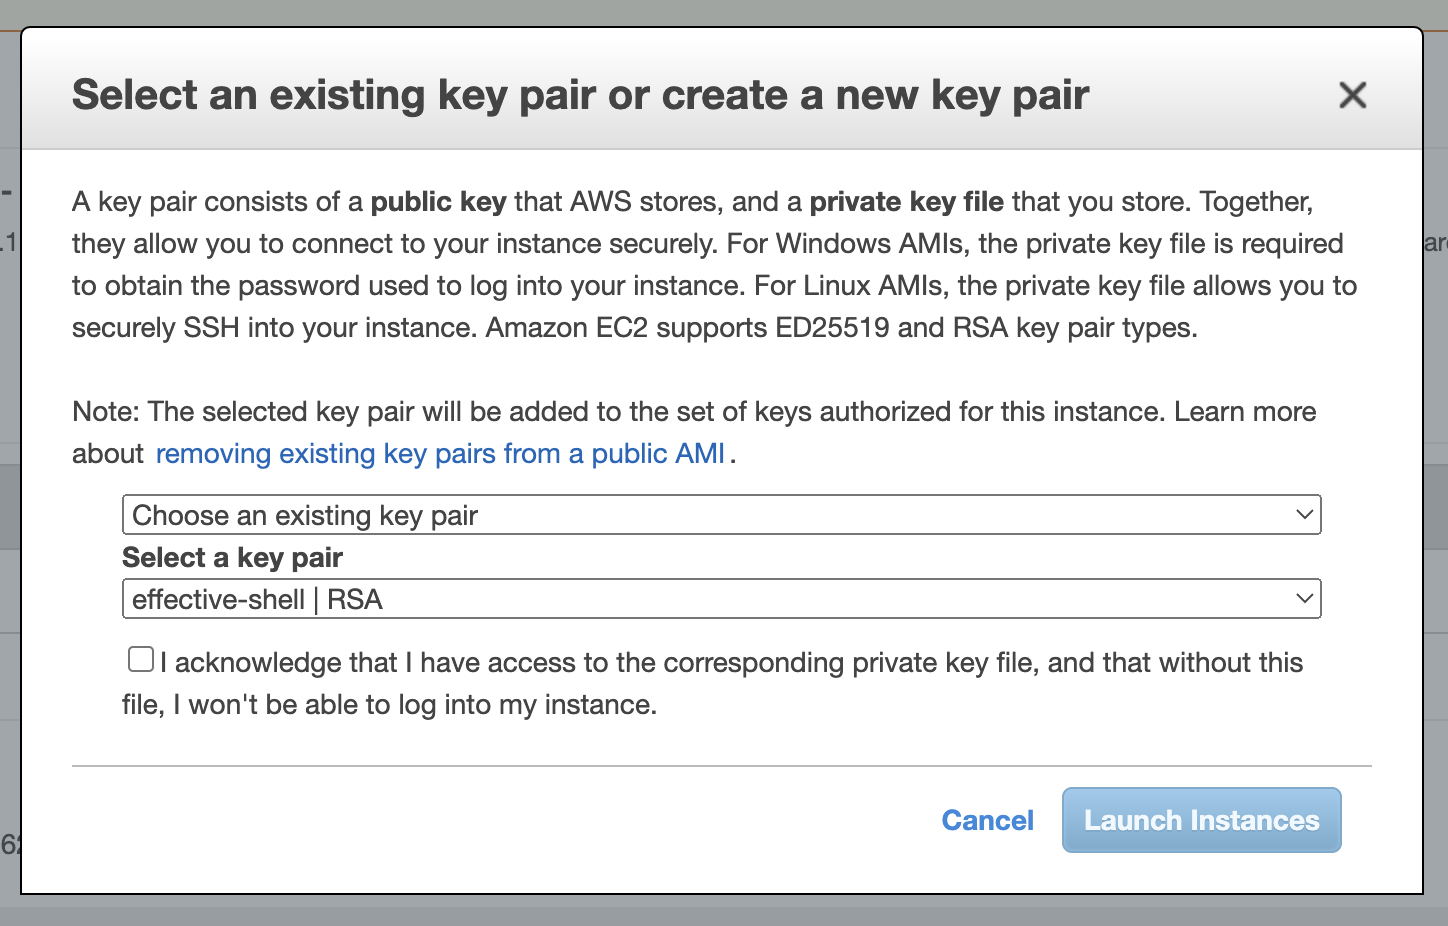
You will be required to select the check box that says "I acknowledge that I have access to the private key" - this is AWS warning us that if we don't have the private key associated with the public key we uploaded, we will not be able to connect to the instance.
Once you have checked the checkbox, you can choose "Launch Instances".
Launching the instance will take a few seconds. Press the "View Instances" button when this is done.
Select the checkbox next to this new instance:
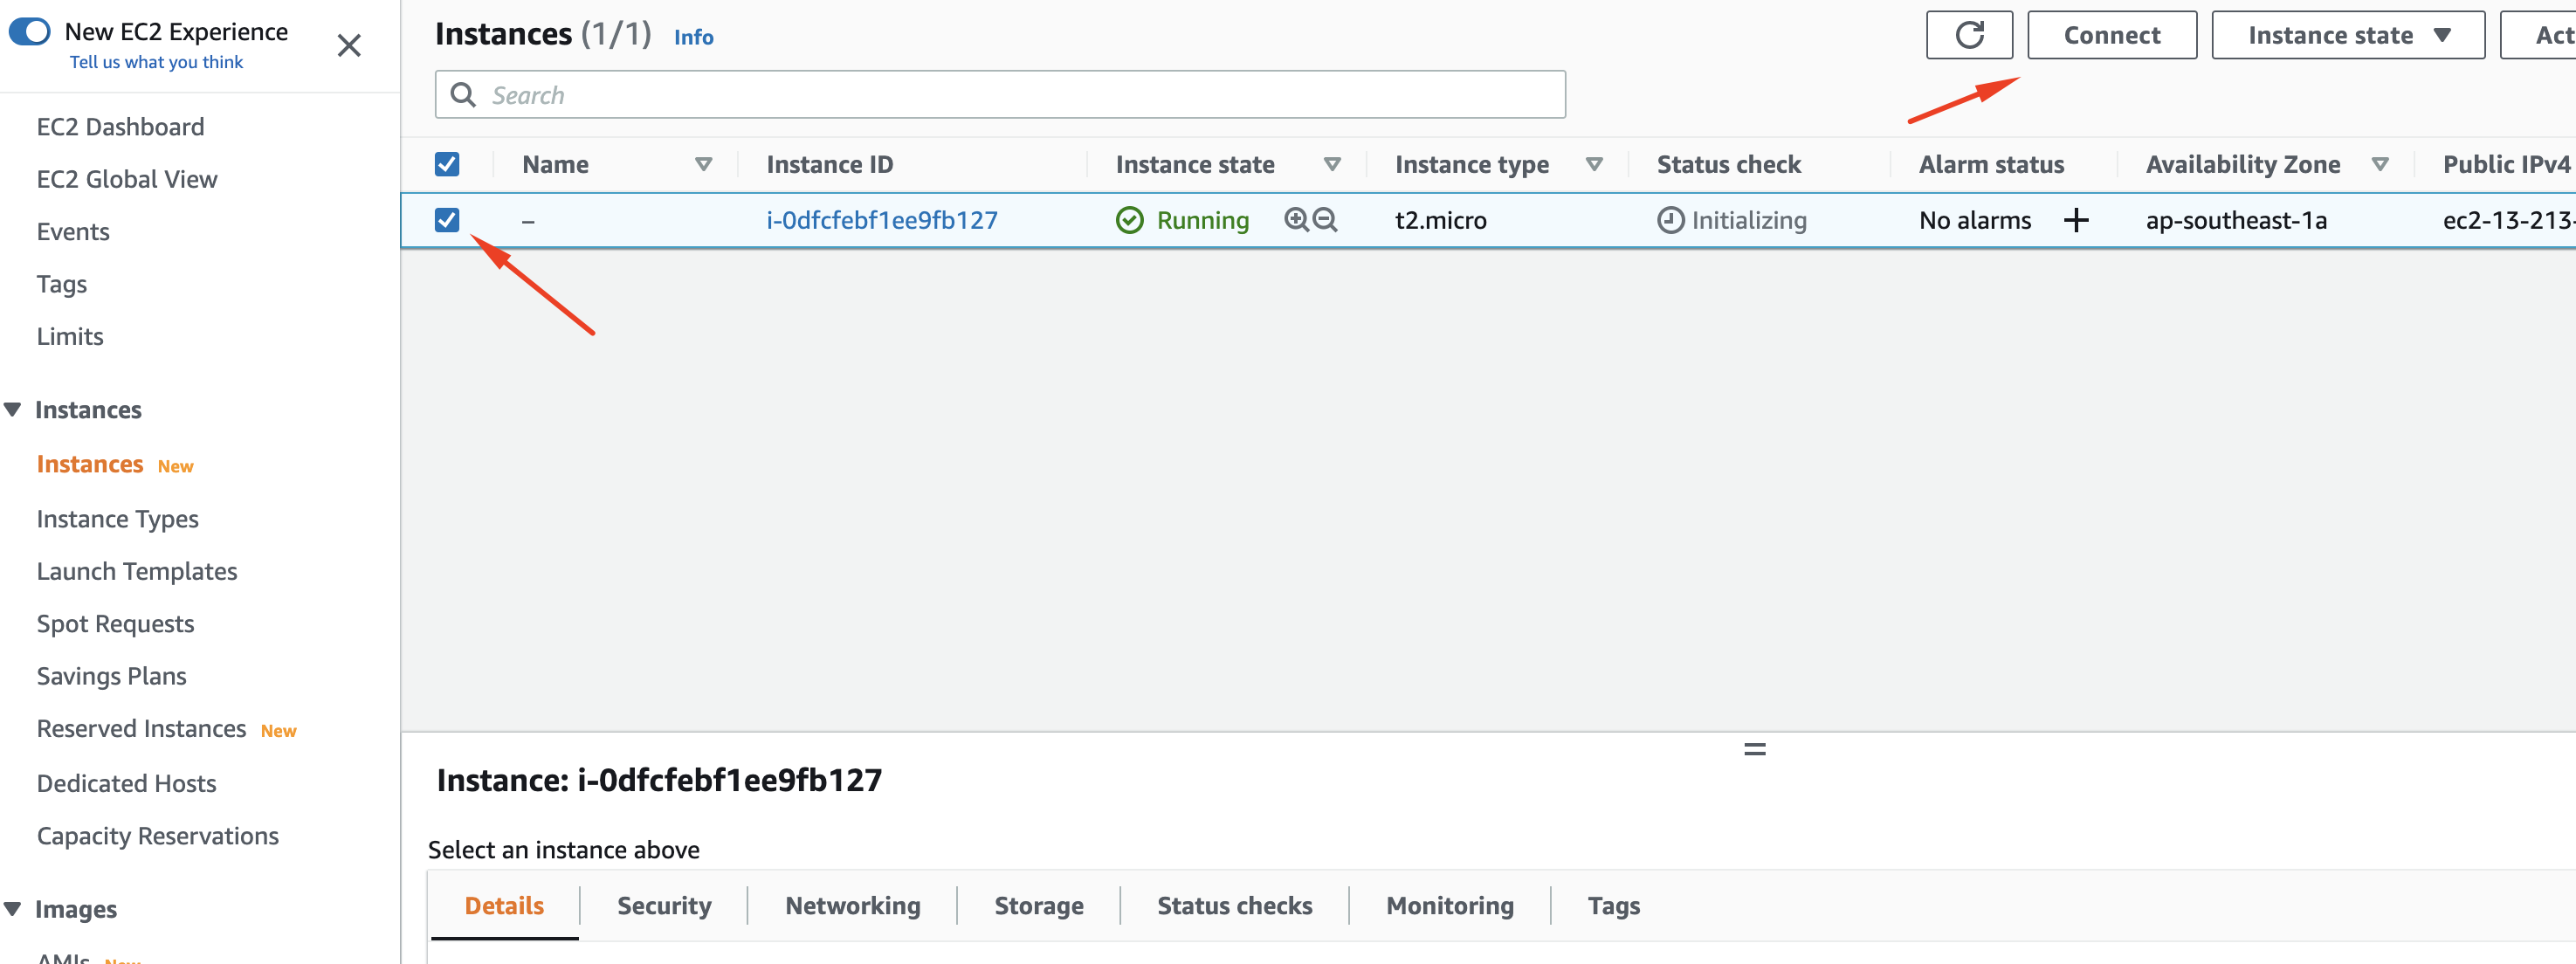
Once you have selected the instance, press the 'Connect' button. In the screen that pops up, choose 'SSH Client':
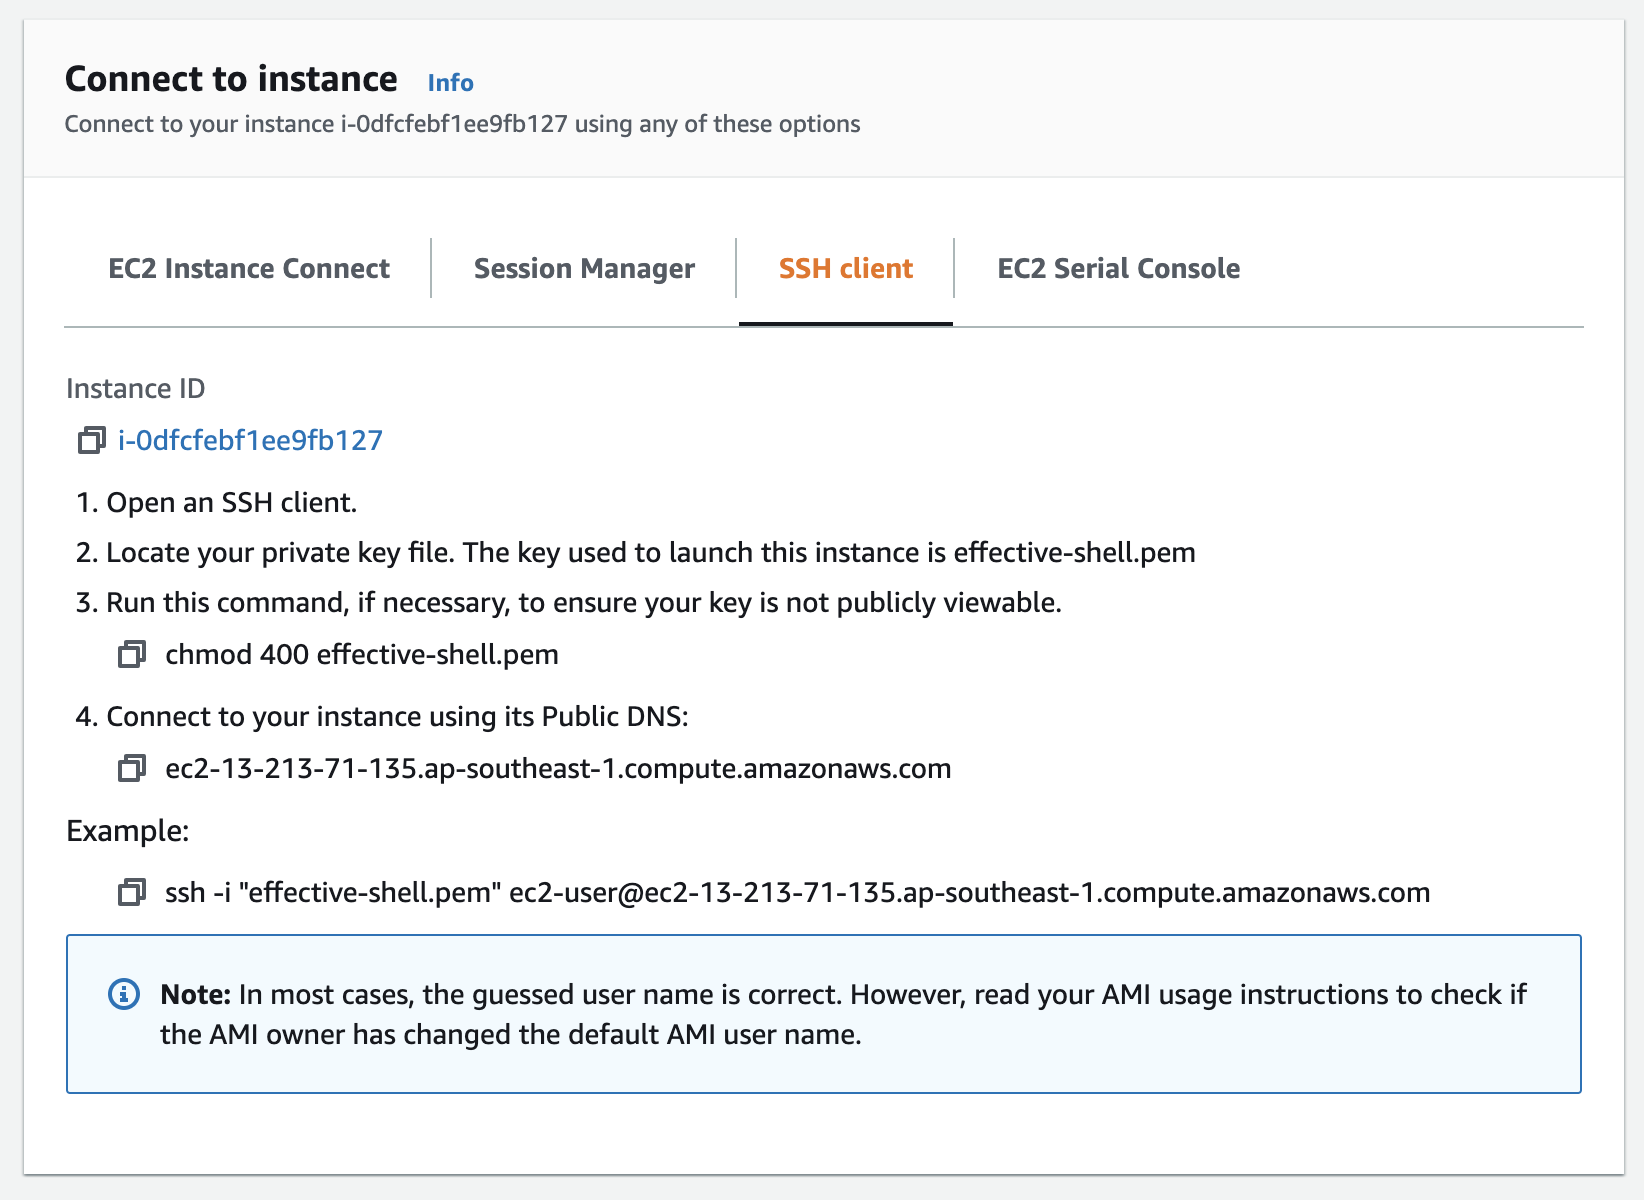
Keep this browser window open, it contains the details we need to know for the next steps.
When you have finished experimenting with your virtual machine, you should power it down. You can select it in the AWS Console and choose the 'Instance State > Stop Instance' option. When you are completely finished with the instance, choose 'Instance State > Terminate'. You should not be billed for this instance as it is in the free tier, but better safe than sorry!
Using SSH to connect to a virtual machine
Now that we have created a virtual machine, we can use the ssh program to open a connection to it and run a secure shell.
When we want to SSH onto a machine, we need to provide a few details:
- The address of the machine, which is its hostname
- The username for the user we are going to connect with
- Credentials for the user we are going to connect with
The address of the machine we have created will be shown in the 'Connect to instance' page we should still have open from the AWS dashboard:
AWS is giving us some hints here about how to connect, it is even showing the specific command we will run with ssh.
From our own shell we will now run the ssh command to connect to our instance. To connect, using the details for my new virtual machine, I would run this command:
ssh -i ~/.ssh/effective-shell ec2-user@ec2-13-213-71-135.ap-southeast-1.compute.amazonaws.com
You can see that we have provided three pieces of information:
- The credentials, by using the
-i(identity file) flag, providing our private key file - The username, which is the
ec2-userpart of the command, coming before the at symbol@ - The hostname, which is the address that follows the
@
When I run this command a warning is shown:
The authenticity of host 'ec2-13-213-71-135.ap-southeast-1.compute.amazonaws.com (13.213.71.135)' can't be established.
ED25519 key fingerprint is SHA256:8wq6Xu4xEk/BO3diae+BWUFTTKunzvCz4XidFYpl6F8.
This key is not known by any other names
Are you sure you want to continue connecting (yes/no/[fingerprint])?
This is my SSH client telling me that I haven't connected to this machine before so it cannot be sure that this machine is one I want to connect to. Once I continue, by entering yes and pressing enter, my SSH client will record the IP address of this machine, as well as it's hostname, meaning that in the future when I connect it will recognise it. If the IP address changes my SSH client will warn me - this is a useful security feature to protect against someone 'swapping' the machine you are connecting to for another one!
After typing yes and pressing enter to continue connecting, I will see Bash running in my AWS Linux virtual machine!
Warning: Permanently added 'ec2-13-213-71-135.ap-southeast-1.compute.amazonaws.com' (ED25519) to the list of known hosts.

       __|  __|_  )
       _|  (     /   Amazon Linux 2 AMI
      ___|\___|___|

https://aws.amazon.com/amazon-linux-2/
[ec2-user@ip-172-31-23-196 ~]$
I have a welcome message from AWS and are running a shell on my virtual machine, via the ssh program from my local machine!
We can see the current shell being used by checking the SHELL variable:
[ec2-user@ip-172-31-23-196 ~]$ echo $SHELL
/bin/bash
We are now ready to run any commands that we like on this machine - at this point you might install programs, manipulate files and so on.
When I want to disconnect, I can just run the exit command to close the connection to the virtual machine.
Hopefully if you have followed this far, you also have access to a virtual machine to play with. Now let's look at some of the things we can do with the SSH to make accessing these machines even easier!
Dealing with Key Permission Errors
It is possible that when you try to use a private key to connect to a virtual machine, you will see an error message like the below:
@@@@@@@@@@@@@@@@@@@@@@@@@@@@@@@@@@@@@@@@@@@@@@@@@@@@@@@@@@@
@         WARNING: UNPROTECTED PRIVATE KEY FILE!          @
@@@@@@@@@@@@@@@@@@@@@@@@@@@@@@@@@@@@@@@@@@@@@@@@@@@@@@@@@@@
Permissions 0644 for 'my-key.pem' are too open.
It is recommended that your private key files are NOT accessible by others.
This private key will be ignored.
bad permissions: ignore key: my-key.pem
Permission denied (publickey).
In this case the server is warning you that your private key could be opened by other users on the system. You can verify this by running ls -a to check the file permissions:
$ ls -al
-rw-r--r--    1 dwmkerr  dwmkerr    1103 Apr 19 12:02 my-key.pem
If you recall that the permissions are the first thing that is shown, you'll see that they are -rw-r--r--. This translates to:
-rw- read and write for the owner, which is the dwmkerr user-r-- read to the group the owner belongs to, which is the dwmkerr group-r-- read to all users
We can see that this is not ideal - other users on the system would be allowed to open the file, and members of the same group would also be allowed to read the file. There is a quick fix for this - set the permissions to read and write for the owner only:
$ chmod 400 my-key.pem
$ ls -al
-rw-------    1 dwmkerr  dwmkerr    1103 Apr 19 12:02 my-key.pem
The chmod (change file permissions) command is used here to set the permissions to 400 - which means read and write for the current user. Once this change is made you will be able to SSH into the server without it complaining about the permissions on your key.
Configuring SSH Hosts
It can be difficult to remember the details such as the host name, location of the key and username of your virtual machines. One thing you can do to make it far easier to connect is to create an entry in your SSH Config file that stores this information. This will let you connect much more quickly.
To create an entry for my virtual machine, I would add the following text to the ~/.ssh/config file:
Host effective-shell-aws-linux
  HostName ec2-13-213-71-135.ap-southeast-1.compute.amazonaws.com
  User ec2-user
  IdentityFile "~/.ssh/effective-shell.pem"
The first part of this configuration is the host 'alias' - how you will refer to the host when you want to connect to it. It can be convenient to give this a short but descriptive name. After this, we have a set of settings, each indented by a tab or two spaces, the settings we have are:
HostNamethe full address of the hostUserthe name of the user to connect asIdentityFilethe path to the private key file used to connect
Now if I want to connect to the virtual machine, all I need to do is run the following command:
ssh effective-shell-aws-linux
In fact the ssh program supports shell completion, meaning I can just type ssh and a few letters of the host then the tab key - the shell will suggest the hosts from my config, so I don't even need to remember the name I set for it:
ssh e<tab> # when I press tab, the shell expands this to:
ssh effective-shell-aws-linux
There are many other options available for the SSH config file, you can see them all with man ssh_config. We'll see some other options in Chapter 33 - Master the Multiplexer.
Running SSH Commands
You don't need to actually run a shell on a remote machine over SSH to execute commands. You can simply provide the commands that you want to run to the ssh program and it will execute them on the server.
Here's an example:
$ ssh effective-shell-aws-linux 'curl effective.sh | ES_EXISTING_FOLDER_ACTION=o sh'
...
effective-shell: installed samples version 0.25.1 to '/home/ec2-user/effective-shell'
effective-shell: read 'effective shell' online at: www.effective-shell.com
In this example we downloaded and ran the Effective Shell samples installer on the server. Now normally when we install the samples, the installer will ask the user whether to overwrite, delete or keep the existing samples. This means that it will be requesting input from the terminal. The ssh program is not actually attaching stdin to the remote machine, so we use the ES_EXISTING_FOLDER_ACTION=o option to tell the installer to overwrite the samples.
If we wanted to be able to interact with the server, using our terminal to provide input, we can use the -t (request TTY) parameter:
$ ssh -t effective-shell-aws-linux 'curl effective.sh | sh'
...
effective-shell: downloaded samples, version 0.25.1
effective-shell: preparing to install the 'effective-shell.com' samples...
effective-shell: the '/home/ec2-user/effective-shell' folder already exists, would you like to:
effective-shell: [d]elete - remove the existing folder
effective-shell: [o]verwrite - extract over the existing folder
effective-shell: [q]uit
Your choice (d/o/q): d
In this example my terminal is attached to the remote server via SSH, meaning I can use the keyboard to provide input to the installer script.
Handling Disconnections
One thing that will soon become a pain if you are regularly SSH-ing into virtual machines is disconnections. This can occur when you lose network connectivity. You might not even notice that a disconnection has occurred - I find it is more common that the ssh session is simply frozen and not responding to any input at all.
It is annoying when this happens - often the shell is so unresponsive that you cannot even free it by pressing ^D or ^C. There is actually an escape sequence that you can use to end a broken session, which is the Enter then ~ then ..
In Chapter 33 - Master the Multiplexer we'll look at some great ways to improve upon this, for now if you forget the Enter/Tidle/Dot escape sequence the easiest thing to do is to close your terminal program.
When you disconnect from your SSH session, the commands you are running will be terminated. This is because your shell will send the 'hang up' signal. Again, this can be frustrating if you actually want to keep something running on the server. We'll also look at how to work around this behaviour in Chapter 33.
Transferring Files with SCP
We can use the scp (OpenSSH secure file copy) program to copy files to and from any remote machine that we have access to.
The format of the scp command is:
scp [parameters] <source> <destination>
We can provide scp with parameters, many of which are the same as the ssh command, such as -i for the Identity File.
The source and destination are normally a pair of designations, one local, one remote. However, you can also copy between two remote machines.
Some examples of how a command might look like are:
scp -i ~/.ssh/my-project.pem ~/project/output.zip dwmkerr@myserver.com:~
- This uses the
-iflag to specify a key - The source is a file called output.zip on the local machine
- The destination is a server with the hostname
myserver.com, connecting with a user nameddwmkerr, and putting the file in the user's home folder
scp -P 8022 effective-shell.com:~/downloads/backup.zip ~/backups
- This copies the downloads/backups folder to the local ~/backups folder
- No username or credentials are specified, so the current user's name is used and any keys that are loaded in the SSH agent will be used to try and authenticate
- We use the
-P(port number) flag to specify port 8022, rather than the default port which is 22
Let's see this in action by copying the lookup tool we created in Chapter 30 - How to Avoid Scripting to our server. Then we'll run it, save some definitions, and copy them back to our local machine.
First we'll use scp to copy our lookup program to our remote machine:
$ cd ~/effective-shell/samples
$ scp ./programs/lookup/lookup.py effective-shell-aws-linux:~
lookup.py                    100% 4485    10.5KB/s   00:00
We have provided the path to the local file, and specified the server we want to copy the file to, as well as the location for the file (which is the home directory).
Note that because we have created the alias effective-shell-aws-linux in our SSH config, we can use this alias for scp as well as ssh. Let's connect to the server now and run the script:
$ ssh effective-shell-aws-linux
Last login: Tue Apr  5 19:03:00 2022 from bb116-15-249-218.singnet.com.sg

       __|  __|_  )
       _|  (     /   Amazon Linux 2 AMI
      ___|\___|___|

https://aws.amazon.com/amazon-linux-2/
[ec2-user@ip-172-31-23-196 ~]$ ./lookup.py cryptography
cryptography: The discipline concerned with communication security (eg, confiden
tiality of messages, integrity of messages, sender authentication, non-repudiati
on of messages, and many other related issues), regardless of the used medium su
ch as pencil and paper or computers.
We can see that our lookup program has been copied to our server and we can run it to find a definition for the word 'cryptography'.
Let's save this definition then close our connection to the server, then copy the definition back to our local machine:
[ec2-user@ip-172-31-23-196 ~]$ chmod +x ./lookup.py
[ec2-user@ip-172-31-23-196 ~]$ ./lookup.py cryptography > definition.txt
[ec2-user@ip-172-31-23-196 ~]$ exit
logout
Connection to ec2-13-213-71-135.ap-southeast-1.compute.amazonaws.com closed.

$ scp effective-shell-aws-linux:~/defintion.txt .
definition.txt               100%  277     1.0KB/s   00:00

$ cat definition.txt
cryptography: The discipline concerned with communication security (eg, confiden
tiality of messages, integrity of messages, sender authentication, non-repudiati
on of messages, and many other related issues), regardless of the used medium su
ch as pencil and paper or computers.
Before we ran the script on the server, we used the chmod (change file permissions) command to ensure the script can be executed. That's all there is to it! Copying files and folders to and from remote machines is remarkably easy to do with scp once you know the basics of how ssh works.
There are many other operations that you can perform with scp, you can read more about the tool with man scp.
Next Steps
Once you are familiar with the core techniques introduced in this chapter, I would suggest that you look into configuration for bastion hosts, port forwarding and VPN tunneling - these are two more advanced scenarios for SSH. As a teaser for when you might want to use some of these techniques, consider the diagram below:
loading...In this scenario we have two hosts, host1.myproject and host2.myproject in a private part of a network, that is not open to the internet. To access these hosts, we use a 'jump box' or 'bastion' - a host that is running in a part of the network that is accessible to external users. We carefully control access to this box and use it as way to connect to the private host.
Now you could SSH onto the bastion, and then SSH onto either of the hosts. But you can speed this process up by setting your ~/.ssh/config like so:
Host bastion
  HostName bastion.myproject.com
  IdentityFile ~/.ssh/myproject.pem
  ForwardAgent yes

Host *.myproject
  ProxyJump bastion
With this configuration we can connect to either of the private hosts by simply using the ssh command with the host name:
ssh host1.internal
The ssh program recognises that host1.internal matches the patter *.myproject from our configuration file. It then sees that we have set the ProxyJump option, which instructs ssh to connect through another host. The other host is the bastion, which is accessible to the user, and has the key specified. We also tell the bastion that it should have its authentication forwarded, so that our private key is used when connecting to the host in the private network (without this option when we connect to the bastion we will not have our keys accessible).
This network configuration is very common and you can see the SSH configuration file supports quickly and conveniently configuring the SSH agent to use the bastion.
There are many advanced options for SSH that will make more complex tasks like this easier to manage.
Summary
In this chapter we discussed the SSH protocol, and how keys are used to protect connections to remote servers. We saw how to setup an AWS account, create a virtual machine with a given public key, connect to it with the ssh program, and configure SSH with an alias to make future connections faster. We also saw some of the challenges we can face with network connectivity - which we'll see techniques to handle in Chapter 33. Finally, we looked at how to copy files to and from remote machines.
- If you want to go deeper, my favourite book on this topic is "Applied Cryptography: Protocols, Algorithms, and Source Code in C - Bruce Schneier". There are more details at the end of the chapter and in the Recommended Reading section.↩
- This process is very useful to know about, it is called Diffie–Hellman key exchange. There are many great articles online that explain it in detail.↩