Master the Multiplexer
Each chapter is being updated to match the latest version of the print book, available from Amazon and No Starch Press. There may be some inconsistencies in links or minor content differences until this page is fully migrated.
If you are regularly using a shell, then learning how to use a terminal multiplexer like screen or tmux can greatly improve your productivity. In this chapter we'll see how what a terminal multiplexer is, what it is used for, learn how to perform some common tasks and configure a multiplexer to make it even more useful.
What is a Terminal Multiplexer?
A terminal multiplexer is a program that that allows a user, or many users, to run many programs at once. The multiplexer manages 'sessions' - these sessions run the programs, independently of your shell or terminal. Users can switch between sessions, save them, resume them, or even invite others to join the same session to allow collaboration. Multiplexers also normally offer 'window management' capabilities, allowing you to break your terminal into separate panes, tabs or windows.
The visual below shows a multiplexer in action - the one I am using while I write this chapter:
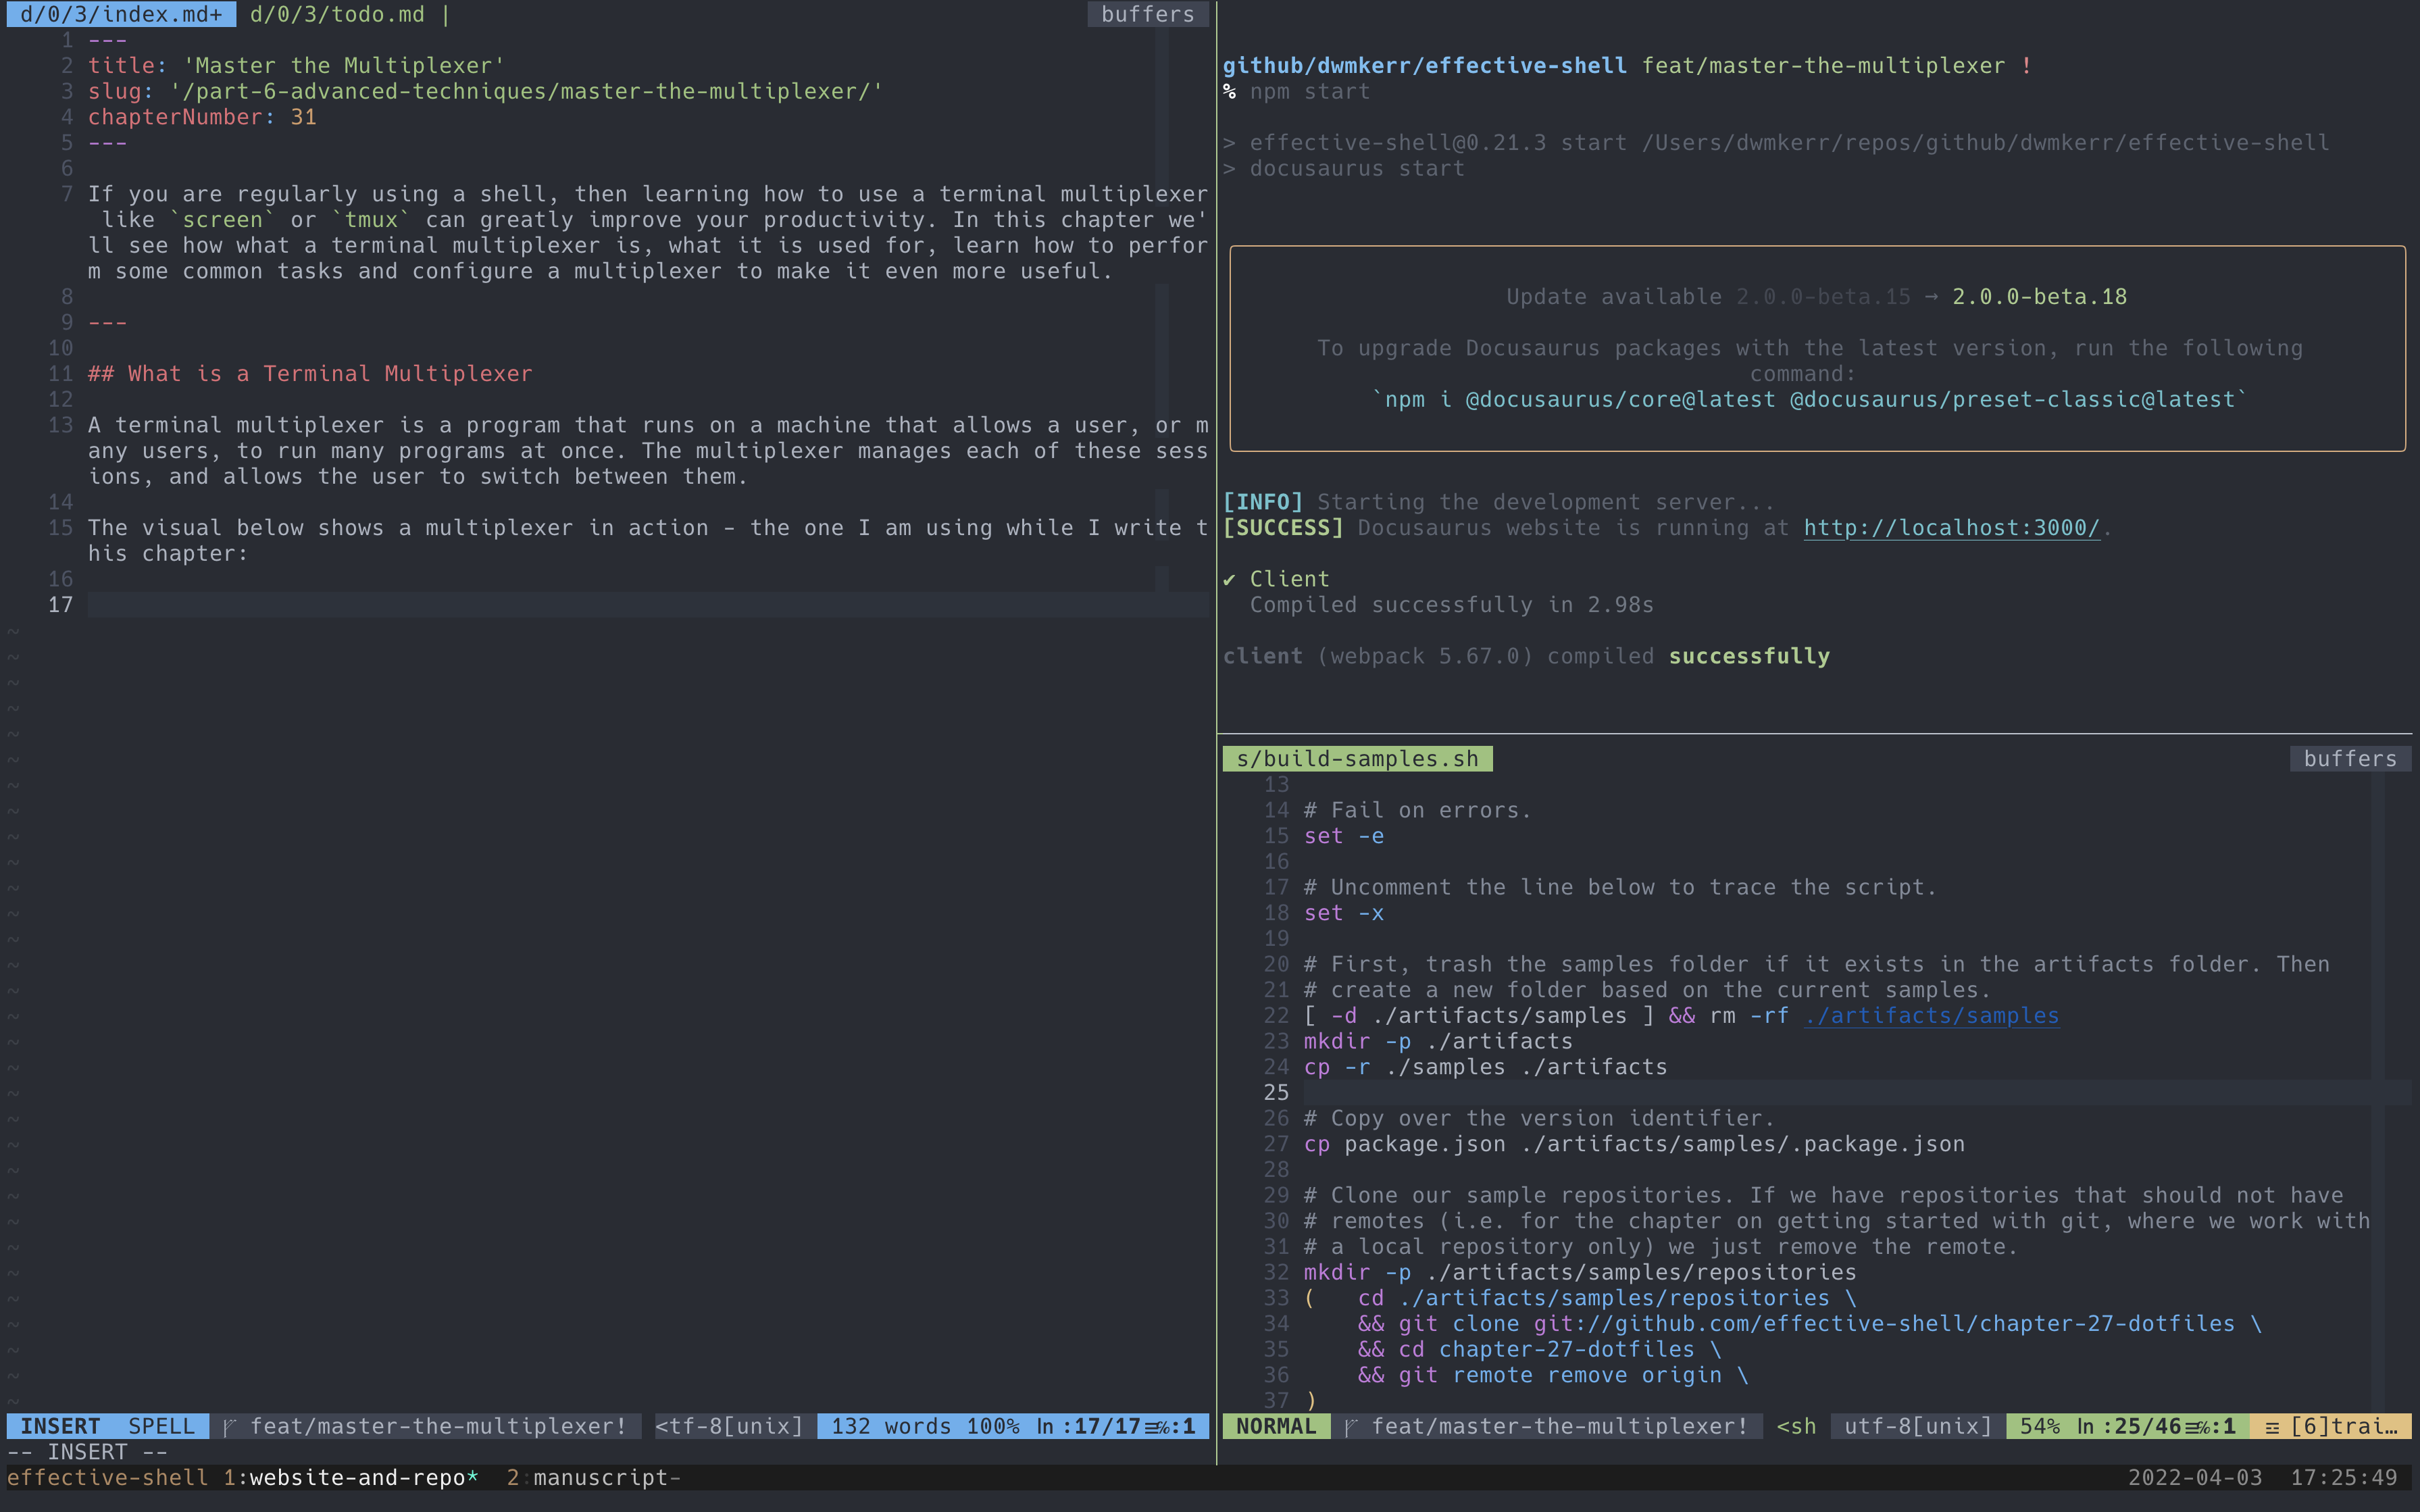
In this image I am running the Tmux multiplexer in my terminal. I have split the window into three panes - a large one on the left that contains the text for the chapter, and two smaller ones on the right. The upper right pane builds the effective shell website locally while I write, to check for errors, and the lower right contains a script I was working on.
When I want to switch between the tasks I'm working on, I don't need to start or stop any of the program, I can just switch between the 'panes' in my multiplexer.
At the bottom of the screen there are also two tabs - one that contains the website and the windows I'm currently working in, and another that has some windows for the manuscript for the book.
If I close my shell, the Tmux server is still running the sessions and I can re-open my terminal and resume. If I was to close my computer, when I restart my multiplexer will restart these programs for me, allowing me to pick up where I left off.
Why use a Multiplexer?
It is not essential to know how to use a multiplexer. But knowing how to use one can certainly help you become a more effective shell user. Some of the key benefits to using a multiplexer are:
Window Management
Much like modern 'tabbed interfaces', multiplexers can support multiple windows, tabs and panes within a window. This means you can arrange your workspace exactly how you want it. You can save the configuration of your windows and use it later. You can organise different windows into different sessions, allowing you to have many projects running at once, that you can quickly switch between, each one with a layout configured to suit your needs.
Persistence of Sessions
Your programs are run independently from your terminal. If your terminal crashes, or freezes, your programs still run. If you are working with a remote machine, then you can run a multiplexer on it to manage your programs. This means that if your connection to the machine is reset, the programs will not stop running. You can re-attach to the session at later point and pick up where you left off. Session management is incredibly useful - you'll wonder how you lived without it if you use the shell a lot.
Configuration
Multiplexers offer many configuration options to allow you to customise how programs are run and interfaced with, allowing you to set up the ideal environment for you to be effective.
Collaboration
A multiplexer is a 'client-server' program. This means you as a user are a client and connect to a server that runs the multiplexer. But other users can connect as well - this means you can easily collaborate with other users, sharing your own work, connecting to theirs, or both working on a shared remote machine.
We'll look at a few of the most immediately useful features of multiplexers in this chapter - this will only really be scratching the surface but should be enough to help you decide whether it is a topic you'll investigate further on your own and add to your toolkit.
Introducing Screen and Tmux
The two most popular multiplexers are probably GNU screen and Tmux. GNU screen was created in the late 80s and has been used widely ever since. It is pre-installed on many Linux systems.
Tmux is a more modern multiplexer, created in 2007. It has most of the features of GNU screen, is also open source, and adds some very useful features to make it a little more user friendly.
For the rest of this chapter we are going to look at Tmux in detail. I've chosen Tmux rather than screen because I think its user-friendliness makes it a little better for people who are new to multiplexers. Once you are familiar with Tmux you might decide to switch to GNU screen - if so it will seem very familiar.
Installing Tmux
Tmux may already be installed on your system. You can check by trying the tmux -V command, which shows the current version:
$ tmux -V
tmux 3.2a
If it is not installed, or you do not have version 3 or higher, you should install the latest version of Tmux. Install Tmux with the package manager for your system. The package name on most distributions is just tmux. As an example, on a Debian-based distribution we would install Tmux with:
apt install -y tmux
Tmux Techniques
Now that Tmux is installed let's see what we can do with it.
The Leader
One thing you'll notice when reading about Tmux and GNU screen is the Leader. The leader is a key combination that prefixes any commands for the multiplexer. We just this leader combination so that the multiplexer key bindings don't clash with any existing ones. Typically you will use the leader keys to tell the multiplexer you are about to enter a command, then strike the keys that correspond to the command.
For Tmux, the default leader is Ctrl + B. For GNU screen it is Ctrl + A. You can easily remember these by remembering that Tmux is a successor to GNU screen, so the leader key letter is one letter further in the alphabet!
Window Management
Run the tmux program by entering the command below:
tmux
We are now going to create some 'splits' - these will split our current window into separate panes. Each pane can run its own program. Let's take a look at a few commands for managing splits and panes.
Creating Splits and Moving Between Splits
We can create a vertical split by pressing Ctrl+B followed by the % percent symbol. We can create a horizontal split by pressing Ctrl+B followed by the " quotes symbol. Finally, to move between splits, press Ctrl+B followed by an arrow key.
The short video demonstrates both types of split and moving between panes:
Zooming Panes
You can 'zoom' a pane so that it takes up the entire window by moving to the pane you want to zoom and pressing Ctrl+b z. To 'unzoom' a pane, you can just move to another pane (even if it is hidden) or simply press Ctrl+B z again.
This what it looks like when we zoom a pane:
Creating Windows and Moving Between Windows
If you want to run a program in an entirely new window, use the Ctrl+b c command to create a window. To switch windows, press Ctrl+b w to choose from the list of available windows:
Quickly Navigating Between Windows
The ^B w command shows all of the windows (and sessions!) for Tmux and let's you rapidly switch between them, this is extremely useful if you have a lot of windows!
Here's how it looks in action - in this demo I have a few windows - notice that I've given them more clear names with ^B ,, this also makes it easier to sort and manage your windows.
Quick Reference
There are some other useful commands when working with windows:
| Command | Description |
|---|---|
^b n | Move to the next window |
^b p | Move to the previous window |
^b 0 | Select the window numbered '0' - use the number of any window from the status pane |
^b & | Close the current window |
^b , | Rename the current window |
^b w | Show the window navigator |
The 'rename window' is very useful if you have a lot of windows and want to give each one a descriptive name. Remember, Tmux is stateful so will remember these settings even if you detached and later re-attach (we'll see this in the next section).
Session Management
Sessions in Tmux are a collection of independently managed windows. They are great for creating lots of 'projects' - each session can be a project with the appropriate windows for the work you are doing.
Let's start Tmux, but name the session effective-shell by using the tmux new -s effective-shell command. Once we've done this, we'll create a couple of windows, then create a new session by using Ctrl+b :. This command opens the Tmux command pane which is shown at the bottom of the screen. This command pane allows us to run a Tmux command. When we do this, we don't need to put tmux at the beginning. Let's create a second session named my-project. We can now switch between sessions with Ctrl+b s. This opens the list of sessions and lets us select one using the arrow keys. Tmux gives us a preview of each session as we move the selection over them.
The commands we will run are below. Remember, ^B means 'Control B', i.e. hold the Ctrl key and press 'b':
# Create a new tmux session with the name 'effective shell'.
tmux new -s effective-shell

# Create a new Window.
^B c

# Enter tmux command mode.
^B :

# Create a second session.
new -s my-project

# Select from the list of sessions.
^B s
We can see visually what this looks like below:
Attaching and Detaching from Sessions
The great thing about sessions is that we can set them up, then detach from them to do other work. The sessions will keep running and we can re-attach to them later. This means you can close your terminal and re-open it and programs will still run.
If we are in the shell and want to open Tmux and attach to whatever was the last session, we can just run:
tmux attach
When we are in a Tmux session, we can detach from it by entering command mode with Ctrl+B : and using the detach command:
^B :
detach
We could close our terminal at this point - the sessions are persisted by the Tmux server. Now if we re-open a terminal, we can re-attach with the same command as before:
tmux attach
A video of how this looks is below:
If you use Tmux a lot you might find you end up with lots of sessions - you can delete sessions by pressing ^B s to show the session list, scroll to the session you want to delete and just press x. Tmux will ask for confirmation before it closes the session.
Some useful shortcuts for sessions are:
Sessions are extremely powerful for organising your work. Some useful commands for working with sessions are:
| Command | Description |
|---|---|
tmux attach | Attach to the last used session |
tmux new -s name | Start a new tmux session named name |
^b : new -s another-name | Enter command mode, start session named another-name |
^b $ | Rename the current session |
^b s | Show the session list. Close the selected session with x |
^b ) | Move to next session |
^b ( | Move to the previous session |
^b w | Show all windows - this command also shows all sessions! |
Configuration
Tmux's out-of-the-box configuration is normally going to be fine for everyday use. However, if you find yourself using Tmux a lot you might want to look at some of the configuration options available to help you fine-tune the program to suit your preferences.
Tmux follows a very standard Unix-style configuration pattern - a dotfile is used to configure the program. If you are not familiar with dotifles, check Chapter 26 - Managing Your Dotfiles - this chapter also goes into detail on how you can version control and save your dotfiles as well as share them across many machines easily.
To configure Tmux, create a file named .tmux.conf in your home directory:
touch ~/.tmux.conf
Now open this file in your preferred editor. As we have just created it there will be nothing in the file.
There are a raft of configuration options available, you can check the manpages with man tmux to see details, or search for any of the excellent online guides on how to configure Tmux. I'll share what I think are some of the most useful configuration options for Tmux1.
Let's add some configuration options, I'll explain each as we go along.
The Default Shell
The first thing I do is to tell Tmux to use my current shell program. This means if I am using Z-Shell, Tmux will open windows with Z-Shell. If I am using Bash, it will use Bash. It will also source my shell dotfiles, so that each window that is opened has the same PS1 and configuration as my standard shell.
# Set the default shell, and set the default command to use our shell (this
# means we source things properly, show the correct PS1 etc).
set -g default-shell ${SHELL}
set -g default-command ${SHELL}
Open windows in the Working Directory
By default when you create a new window with ^B c, Tmux will set the working directory of the window to the home directory. In general I prefer to have the window open in my current working directory:
# Open new panes and splits in the same working directory.
bind c new-window -c "#{pane_current_path}"
Stable window names and sequential windows
Tmux will try to be smart and change the name of each window to the program it is currently running. This means window names change as you use them. I find this distracting, so disable the automatic renaming of windows - in general I rename a window as soon as I have opened it with ^B , and give it a descriptive name.
I also set Tmux to start windows from number 1 rather than 0, and when windows are created or deleted ensure that Tmux re-numbers them so that they are sequential, without gaps. If you don't do this you'll rapidly find yourself running into windows with double-digit numbers which are harder to select (you can only use ^B <window-number to select windows 0 through 9):
# Set the name of the window initially, but then don't let tmux change it.
# The name can still be set at any time with Ctrl+B + ,
set-option -g allow-rename off

# Start windows and panes at 1.
set -g base-index 1
set -g pane-base-index 1

# When we add/remove windows, renumber them in sequential order.
set -g renumber-windows on
Sensible Splitting Commands
I've always found ^B % and ^B " odd commands to split, and still to this day regularly mix them up. So I use ^B - to make a vertical split and ^B | t make a horizontal split. The direction of the bar, either the hyphen or vertical bar I find much easier as a way to remember what kind of split I'll be making!
# Split panes using | and -
bind | split-window -h -c "#{pane_current_path}"
bind - split-window -v -c "#{pane_current_path}"
Nested Session Leaders
I am almost never not in a Tmux session. This means that if I open a nested session, for example by ssh-ing into a virtual machine that and running Tmux there, I have trouble sending commands to the nested Tmux - if I use ^b c to open a new window for example, it'll open the window on my machine, not in the nested session. By using bind-key v send-prefix I can use ^b b to send a command to the nested session. This might sound fiddly but we'll see how useful it is in the next section!
# Use ^b b to send the leader to a nested session. This means if you are
# using tmux and then ssh into a tmux session (i.e. a nested session) you
# can run commands in the nested session with ^B b <command>.
bind-key b send-prefix
Mouse Support
If you have a mouse, which will normally be the case if you are working with your local machine, then you can enable the mouse for Tmux, allowing you to drag panes to resize them, select panes and windows with the mouse and so on.
If you are feeling like you want to really get your 'mouseless' flow working - disable this option! It'll force you to learn the commands.
# Enable mouse mode (tmux 2.1 and above)
set -g mouse on
Vim Mode!
I set a number of configuration options to help Tmux interface more seamlessly with Vim, and also use Vim directions rather than arrow keys to move around. This means I use ^B j to go to the pane below, ^B l to go to the pane to the right.
I have also configured a number of keybindings to make resizing panes a little more intuitive to a Vim user, as well as keybindings for Vim style selection of text.
These are more advanced options and only going to be of interest to Vim users however, so I'll let you explore them if you are interested in my dotfiles project at github.com/dwmkerr/dotfiles
Advanced Configuration
We have really only touched the most basic of configuration options. Tmux can be customised in almost any way imaginable.
The visual style of the status bar, the colours, the information shown, all of these settings can be changed. There are also plugin-managers for Tmux to make it easier to install plugins that provide more advanced configurations.
This is a more advanced topic and one I would only suggest exploring once you are familiar with 'vanilla' Tmux!
Collaboration
So far we have run all of our sessions on our local machine. This is great for organising your local work. But you can run Tmux on another machine or server, then connect to it from your machine.
This is another quite advanced topic, but to show just how powerful this can be, the video below demonstrates some of Tmux's features and how they can make working across many machines so much easier.
In this video, the following actions are performed:
- We start a local Tmux session with
tmux - We split the window, giving us space to open a secure shell, using
^b % - In our new split, we ssh onto the box we created in Chapter 31 - The Secure Shell
- On this box, we start a new Tmux session
- In this Tmux session we start creating a new Python script
- Now we connect to this session from our local machine over ssh using
ssh -t effective-shell-aws-linux tmux attach - This attaches us to our session on the server - and we're in Vim ready to work on the script!
- To complete the demo, I connect from another machine, my Macbook - and then edit the script live
In this demo we have two separate machines connecting to our server, able to collaborate real-time on a Tmux session that will persist even if we shut down the machines we are connecting from. This just touches the surface of what is possible!
In this example we used the command ssh -t effective-shell-aws-linux tmux attach. The ssh program allows you to run a command on the server. The command we are running is tmux attach. Now by default if we ask ssh to run a command it will not connect the input of our terminal to the server - the idea is that sometimes we are just using ssh to run one-off commands and don't need to stay connected. But for this command we actually want to stay attached to the server, so we use the -t request tty` flag to attach our terminal input to the SSH session.
You can setup your SSH config file to automatically attach to the Tmux session. This is how my ~/.ssh/config file entry is setup for the virtual machine we created in Chapter 31 - The Secure Shell:
Host effective-shell-aws-linux
  HostName ec2-13-213-71-135.ap-southeast-1.compute.amazonaws.com
  User ec2-user
  IdentityFile ~/.ssh/effective-shell
  RequestTTY yes # ensure that we attach our terminal input
  RemoteCommand tmux attach # attach to the tmux session
This configuration means that when we SSH onto the effective-shell-aws-linux box we will run the tmux attach command and attach our terminal. To connect to Tmux on the server now we only need to run:
ssh effective-shell-aws-linux
Going Further with Tmux
We've really only touched the surface of what Tmux can do. There are some truly incredible things you can do with a multiplexer like Tmux as you start to use it more. Selecting text from the shell without touching the mouse, seamless integration of Tmux splits and Vim splits, sending commands to multiple machines at once, using plugin managers to add advanced features, the list goes on.
Tmux also lets you rapidly resize panes, break a pane into its own window or session, re-order panes, swap panes and so on. These commands are probably the next ones to start becoming familiar with! If you have enabled mouse mode you can also resize panes with the mouse if you have one available.
I'd highly recommend using Tmux as part of your standard workflow - get familiar with the basic features shown in this chapter and then as you start to find limitations and want to do more explore some of the great books and blog posts out there that go into more advanced features.
Getting Help
You can quickly see all of the Tmux commands by running ^b ?. The output of this command will look something like this:
C-b C-b     Send the prefix key
C-b C-o     Rotate through the panes
C-b C-z     Suspend the current client
C-b Space   Select next layout
C-b !       Break pane to a new window
C-b "       Split window vertically
C-b #       List all paste buffers
C-b $       Rename current session
C-b %       Split window horizontally
C-b &       Kill current window
C-b '       Prompt for window index to select
C-b (       Switch to previous client
C-b )       Switch to next client
C-b ,       Rename current window
C-b .       Move the current window
C-b /       Describe key binding
C-b 0       Select window 0
C-b 1       Select window 1
...
A quick reference of command commands below:
| Command | Description |
|---|---|
| Essential Tmux Commands | |
tmux ls | List sessions |
tmux new [-s name] | Start a new tmux (optionally with a session name) |
tmux attach [-t name] | Attach to the last used session, or the target session with -t |
tmux kill-session [-t name] | Kill a session named name |
tmux kill-session -a | Kill all sessions except the current session |
^b d | Detach from the current session |
^b : new -s another-name | Enter command mode, start session named another-name |
^b ? | Show command help |
| *Sessions | |
^b $ | Rename the current session |
^b s | Show the session list. Close the selected session with x |
^b ) | Move to next session |
^b ( | Move to the previous session |
^b w | Show all windows - this command also shows all sessions! |
| Windows | |
^b n | Move to the next window |
^b p | Move to the previous window |
^b 0 | Select the window numbered '0' - use the number of any window from the status pane |
^b & | Close the current window |
^b , | Rename the current window |
^b w | Show the window navigator |
^b $ | Kill the current window |
| Splits and Panes | |
^b % | Create a horizontal split |
^b " | Create a vertical split |
^b <arrow> | Move to the pane in the direction of an arrow key |
^b z | Zoom in or out of a pane |
^b ! | Convert pane to window |
Going Further with Tmux
To learn more about Tmux I recommend the excellent book tmux 2: Productive Mouse-Free Development by Brian Hogen. This is suitable for anyone, from beginner to expert, you can regularly go back to it as you become more familiar with the basics of Tmux and learn how to take your skills to the next level!
Summary
In this chapter we introduced the concept of Terminal Multiplexers, in particular GNU screen and Tmux. We saw how to manage windows, panes and sessions. We learned how to configure Tmux to suit your personal working style. We also looked at how we can use Tmux to manage sessions on remote machines and even collaborate real time with other users.
- You can find my complete set of dotfiles at github.com/dwmkerr/dofiles if you would like to see how I configure other programs.↩